
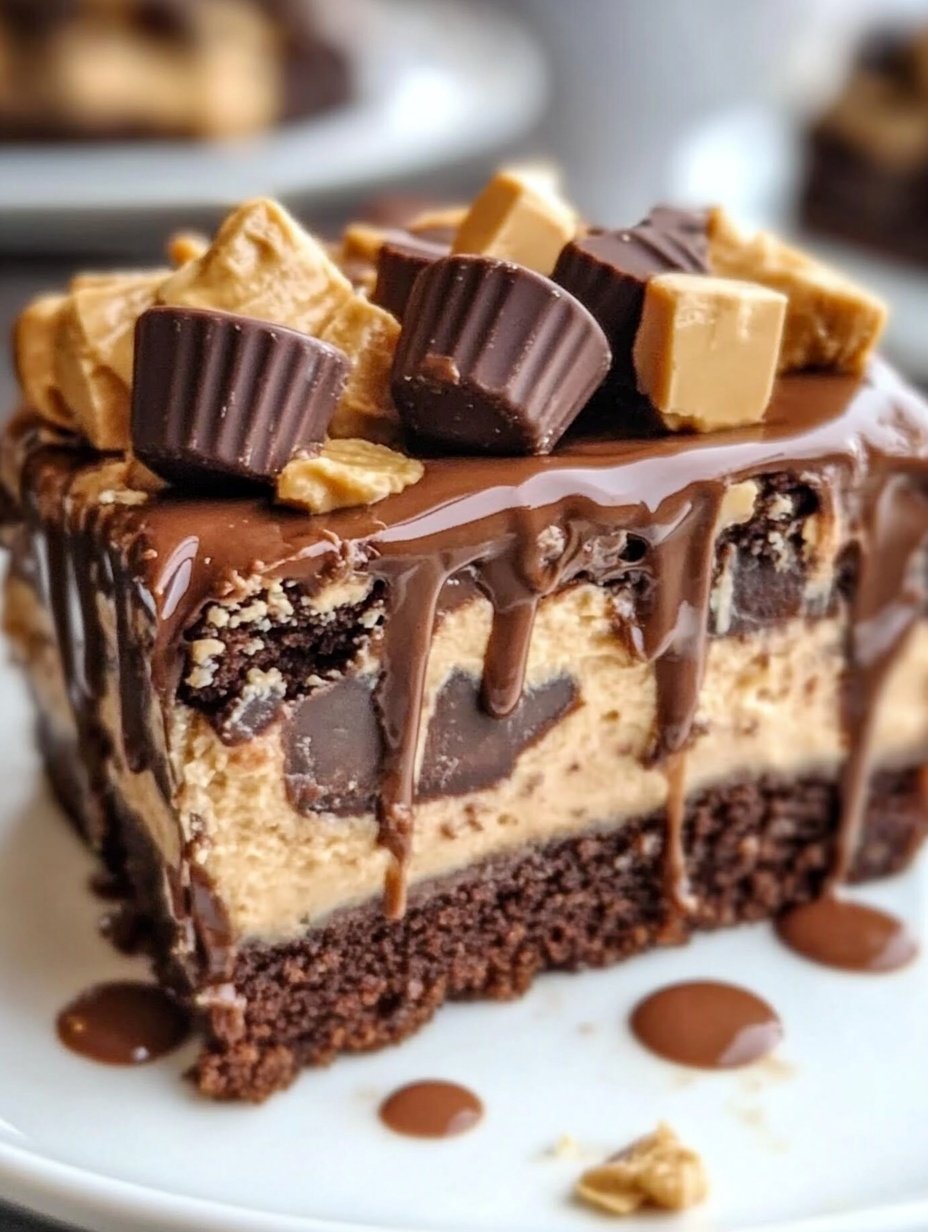
There’s something undeniably nostalgic about Reese’s Peanut Butter Cups. Growing up, they were always a favorite treat—rich, chocolatey, with that perfect peanut butter center. I wanted to create a dessert that captured that same indulgent magic but with a little more wow factor. That’s how this Reese’s Peanut Butter Cup Earthquake Cake was born. It’s decadent, gooey, and visually dramatic with its “cracked” top and flowing peanut butter-chocolate lava inside. Every time I make it, I find myself watching it rise in the oven with childlike excitement.
What makes this cake so special is how it looks like it broke apart in the oven—hence the name “Earthquake Cake.” The creamy peanut butter, fudgy chocolate, and chunks of Reese’s cups melt into irresistible ribbons throughout the cake, giving you a different surprise in every bite. It’s the kind of dessert you bring to a party, and not a single crumb is left on the plate.
Why You Will Love This Recipe
This cake isn’t just beautiful—it’s absolutely delicious. If you love chocolate and peanut butter, it’s a dream come true. The texture is rich and gooey in the center while slightly crisp around the edges, and every mouthful has just the right balance of sweet and salty.
It’s also incredibly simple to make. There’s no need for professional skills or special equipment. You just layer, swirl, bake, and let the magic happen. Plus, it uses everyday ingredients, most of which you likely already have in your pantry.
Versatile
One of my favorite things about this cake is how easy it is to customize. Want to add chocolate chips or chopped nuts? Go ahead. Prefer a different candy bar? Swap it in. You can even experiment with white chocolate or drizzle some peanut butter glaze on top. It’s a flexible recipe that welcomes creativity.
Affordable
This recipe is also budget-friendly. You don’t need to spend a lot to make a dessert that feels luxurious. A box of cake mix, cream cheese, some pantry staples, and a few Reese’s cups—that’s all it takes to whip up this crowd-pleaser.
Ingredients for the Recipe
-
1 box chocolate fudge cake mix
-
1/2 cup vegetable oil
-
3 large eggs
-
1 1/4 cups water
-
8 oz cream cheese, softened
-
1/2 cup unsalted butter, melted
-
3 cups powdered sugar
-
1/2 cup creamy peanut butter
-
1 tsp vanilla extract
-
1 cup semi-sweet chocolate chips
-
10–12 Reese’s Peanut Butter Cups, chopped
How to Prepare This Recipe
This cake may look like a masterpiece, but I promise it’s surprisingly easy to prepare. The key is in the layering and gentle swirling of the different elements. Once it hits the oven, the batter does all the work—rising, cracking, and creating those molten pockets of peanut butter and chocolate.
Let’s walk through the entire process step by step.
Step-by-Step Instructions for Preparation
Step 1: Preheat and Prepare the Pan
Begin by preheating your oven to 350°F (175°C). Lightly grease a 9×13-inch baking pan. I recommend lining it with parchment paper for easy removal and clean edges, especially if you’re planning to serve this at a gathering.
Step 2: Mix the Cake Batter
In a large bowl, combine the chocolate fudge cake mix, vegetable oil, eggs, and water. Use a hand mixer or whisk to beat the ingredients until the batter is smooth and lump-free. This should take about 2 minutes. Once fully blended, pour the cake batter into the greased pan and spread it out evenly using a spatula.
Step 3: Prepare the Cream Cheese Filling
In a separate bowl, mix the softened cream cheese and melted butter until smooth and creamy. Add the powdered sugar gradually while mixing, followed by the vanilla extract and peanut butter. Continue beating until the mixture is silky and thick. It should resemble a creamy frosting in texture.
Step 4: Layer and Swirl
Spoon dollops of the cream cheese mixture over the surface of the chocolate cake batter. Use a butter knife or skewer to swirl the two mixtures together lightly. Be careful not to overmix—you want to create ribbons of cream cheese that will bake into gooey pockets, not a fully blended batter.
Step 5: Add the Toppings
Sprinkle the chopped Reese’s Peanut Butter Cups evenly across the top of the swirled batter. Then scatter the chocolate chips over everything. As the cake bakes, these bits will melt into the surface and become delicious, sunken surprises.
Step 6: Bake
Place the cake in the preheated oven and bake for 35 to 45 minutes. Baking times can vary depending on your oven, so start checking around the 35-minute mark. Insert a toothpick near the center—if it comes out with moist crumbs but not raw batter, the cake is done. Don’t worry if it looks cracked or sunken in some spots. That’s part of its charm.
Step 7: Cool Before Cutting
Let the cake cool in the pan for at least 30 minutes. The center will continue to set as it cools, and the flavors will meld beautifully. Once it’s cool, slice into squares or rectangles. For a cleaner cut, chill the cake for a short time before slicing.
Quick and Easy
Despite its stunning appearance and complex flavor, this cake is incredibly beginner-friendly. There’s no need for sifting, layering, or precision. You can go from mixing to baking in under 20 minutes, and the result is always impressive.
It’s also a time-saver when you need a last-minute dessert. Using a boxed mix as the base significantly cuts down on prep time while still delivering rich, homemade flavor.
Customizable
This recipe allows for a lot of creativity. If you’re baking for someone who doesn’t like peanut butter (rare, but it happens!), you can substitute it with almond butter or cookie butter. Add chopped nuts for extra crunch, or try white chocolate chips for a sweeter variation.
If you want to make it a layered dessert, you can even turn this into a trifle by layering slices with whipped cream and crushed graham crackers in a glass dish.
Another tip: Warm up individual slices in the microwave for 10–15 seconds for a gooier, lava cake-like experience.
Popular With Many People
Whenever I make this cake, it gets rave reviews. It’s beloved by kids and adults alike. The bold flavors, creamy filling, and gooey chocolate make it feel like a treat straight from a bakery. It’s perfect for birthdays, potlucks, holidays, or anytime you want to wow a crowd with minimal effort.
If you’re baking for a special occasion or just indulging in a personal craving, this Reese’s Peanut Butter Cup Earthquake Cake is sure to satisfy. The way the flavors come together makes it unforgettable, and it’s one of those recipes people will ask you for again and again.
PrintReese’s Peanut Butter Cup Earthquake Cake

This Reese’s Peanut Butter Cup Earthquake Cake is a decadent, rich dessert inspired by the classic peanut butter cup candy. It features a fudgy chocolate cake base swirled with creamy peanut butter and cream cheese filling, topped with chunks of Reese’s cups and chocolate chips. The cracked “earthquake” top reveals gooey pockets of peanut butter and chocolate that melt in your mouth with every bite. Perfect for peanut butter and chocolate lovers, this cake is simple to prepare yet impressively indulgent.
- Prep Time: 15
- Cook Time: 40
- Total Time: 55 minutes
- Yield: 16 1x
Ingredients
For the cake layer:
- 1 box chocolate fudge cake mix
- 1/2 cup vegetable oil
- 3 large eggs
- 1 1/4 cups water
For the filling:
- 8 oz cream cheese, softened
- 1/2 cup unsalted butter, melted
- 3 cups powdered sugar
- 1/2 cup creamy peanut butter
- 1 tsp vanilla extract
Toppings:
- 1 cup semi-sweet chocolate chips
- 10–12 Reese’s Peanut Butter Cups, chopped
Instructions
- Preheat oven to 350°F (175°C). Lightly grease a 9×13-inch baking pan or line it with parchment paper.
- Mix the cake batter: In a large mixing bowl, combine the chocolate fudge cake mix, vegetable oil, eggs, and water. Beat until smooth and fully blended, about 2 minutes. Pour the batter into the prepared pan and spread it evenly.
- Prepare the filling: In a separate bowl, beat the softened cream cheese and melted butter until smooth. Gradually add powdered sugar while mixing. Add peanut butter and vanilla extract, and beat until creamy and thick.
- Layer and swirl: Drop spoonfuls of the cream cheese mixture evenly over the cake batter. Use a knife to gently swirl the two mixtures together, creating ribbons without overmixing.
- Add toppings: Sprinkle chopped Reese’s Peanut Butter Cups and chocolate chips evenly over the top of the batter.
- Bake: Place the pan in the preheated oven. Bake for 35 to 45 minutes, or until a toothpick inserted into the center comes out with moist crumbs but no raw batter.
- Cool and serve: Let the cake cool in the pan for at least 30 minutes before slicing. For neater cuts, chill briefly before serving.
Notes
For a gooier texture, warm individual slices before serving.
For variation, swap in white chocolate chips or drizzle melted peanut butter on top after baking.
This recipe freezes well when sliced and wrapped individually.
FAQs
Can I make this cake in advance?
Yes, this cake can be made a day in advance. Once cooled, cover it tightly and store it at room temperature or refrigerate if your kitchen is warm. Before serving, let it come to room temperature or microwave slices for 10–15 seconds to soften the texture and enhance the gooeyness.
Can I freeze Earthquake Cake?
Absolutely. Let the cake cool completely, then slice it into portions. Wrap each piece individually in plastic wrap, place them in a freezer-safe bag or container, and freeze for up to 2 months. Thaw at room temperature or microwave for a warm, fudgy treat.
Is it possible to make this without peanut butter?
Yes, you can substitute the peanut butter with almond butter, cashew butter, or even cookie butter for a different flavor. The texture will remain rich and creamy, and the result will still be indulgent.
Can I use homemade cake batter instead of a mix?
Definitely. If you prefer a from-scratch chocolate cake, feel free to use your favorite recipe. Just ensure it yields enough batter to fill a 9×13-inch pan so the layers bake properly.
Can I double the recipe?
Yes, simply double all the ingredients and use two 9×13 pans or a large sheet pan. Bake time may vary slightly, so check for doneness around the 40-minute mark.