
There’s something irresistibly nostalgic about the cool, creamy bite of an Andes Mint. The combination of smooth chocolate and refreshing mint always takes me back to the comforting moments after a meal, when that little green-wrapped treat would melt perfectly on the tongue. That’s exactly what inspired me to recreate this classic candy in my own kitchen. My homemade Andes Mints bring together that same rich, layered flavor with the satisfaction of making it from scratch – and honestly, they taste even better than the store-bought version.
What I love most about this recipe is how simple and rewarding it is. With only a handful of pantry-friendly ingredients, you can make a batch of mints that look elegant, taste luxurious, and require very little effort. The layers of silky chocolate and mint filling set beautifully and can be cut into neat little squares that are perfect for sharing, gifting, or adding to dessert platters. They’re also a fantastic make-ahead treat because they store well and even taste better after chilling overnight.
You will love this recipe for so many reasons. First, it’s incredibly versatile. You can adjust the level of mint to suit your taste, use dark or milk chocolate depending on your preference, and even color the mint layer for festive occasions. These mints can be made thicker for a fudgy bite or thinner for a delicate, melt-in-your-mouth texture. They can be presented as elegant homemade gifts, after-dinner mints, or simply as a little treat to enjoy with coffee or tea.
Another thing that makes this recipe so appealing is how affordable it is. Instead of spending money on boxed chocolates, you can make dozens of pieces at home for a fraction of the cost. Every bite feels like a little indulgence without breaking the budget. Plus, the ingredients are all easy to find and require no special tools—just some patience and a love for chocolate-making.
Ingredients for Homemade Andes Mints:
-
2 cups semi-sweet chocolate chips (or use dark chocolate if preferred)
-
1 cup white chocolate chips
-
1 teaspoon peppermint extract
-
2 tablespoons butter
-
A few drops of green food coloring (optional for the mint layer)
-
Parchment paper for layering
These simple ingredients come together to create perfectly balanced chocolate mint layers that will melt in your mouth with every bite.
HOW TO PREPARE THIS RECIPE
Making Homemade Andes Mints is a fun and rewarding process that delivers beautifully layered, professional-looking chocolates without much effort. I love how quick and easy this recipe is, yet it looks like something straight from a chocolatier’s display case. The key is to work patiently, allowing each layer to set properly before adding the next. Let me walk you through every step so you can achieve perfect results on your first try.
Step-by-Step Instructions for Preparation
Step 1: Prepare your pan
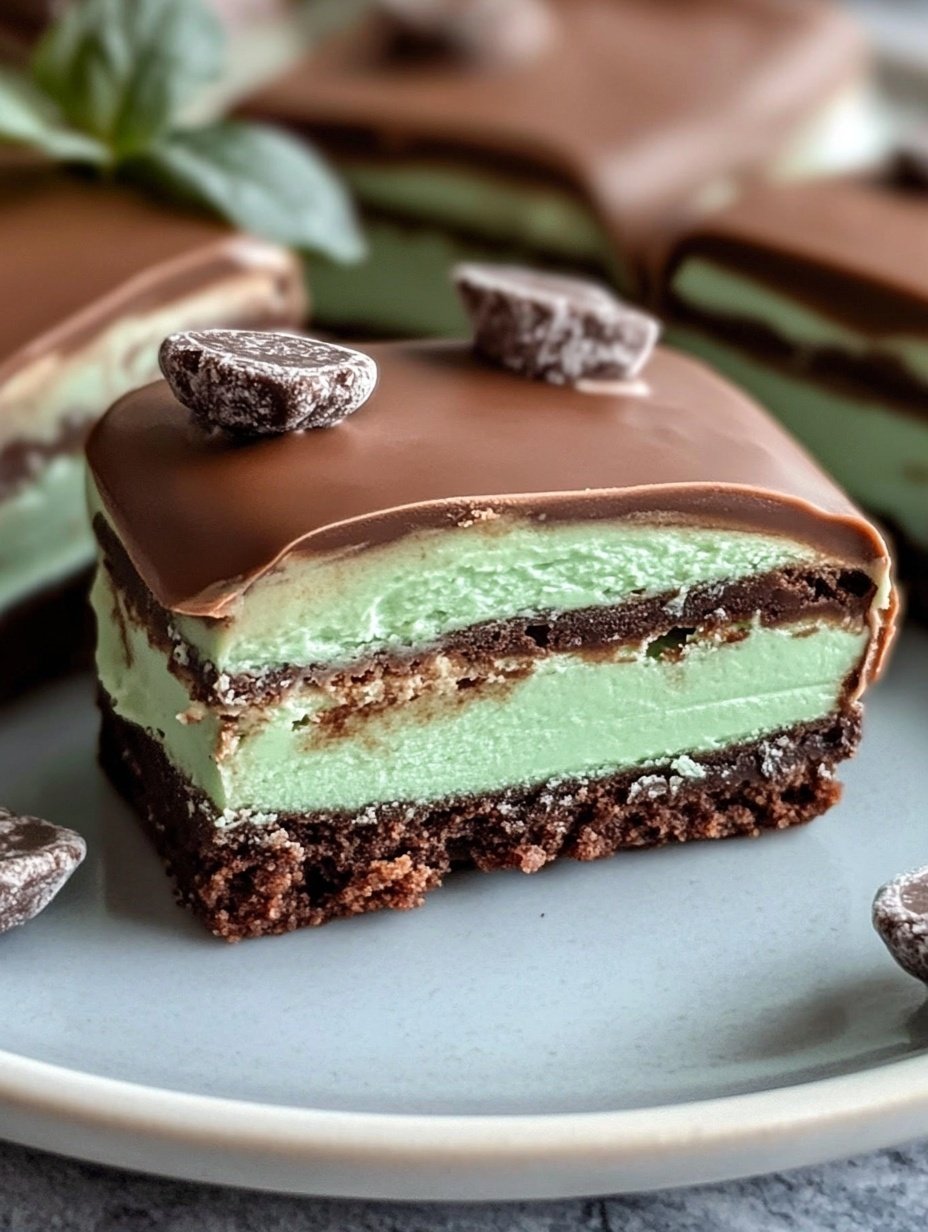
Start by lining a small baking dish or pan (around 8×8 inches) with parchment paper. Leave some extra parchment over the sides so you can easily lift the chocolate out once it’s set. This step makes the entire process cleaner and ensures your mints come out in one neat piece.
Step 2: Melt the first chocolate layer
In a heatproof bowl, add 1 cup of semi-sweet chocolate chips and 1 tablespoon of butter. Melt them together using a double boiler method or in the microwave at 15–20 second intervals, stirring frequently. Continue until the chocolate becomes smooth and glossy. Be careful not to overheat it—chocolate can seize if it gets too hot.
Once melted, pour the chocolate into the prepared pan and spread it evenly with an offset spatula or the back of a spoon. Place the pan in the refrigerator for about 10 minutes, or until the layer is slightly firm but not completely set. This gives the next layer something to hold onto while still bonding nicely.
Step 3: Make the mint layer
In another bowl, combine the white chocolate chips and 1 tablespoon of butter. Melt them using the same method—short bursts in the microwave or over a double boiler—until smooth. Once melted, add the peppermint extract and a few drops of green food coloring if you want that classic mint look. Stir well until the mixture is uniform in color.
Let this mixture cool slightly for about 2–3 minutes before pouring it over the first chocolate layer. You don’t want the heat from the mint layer to melt the base. Carefully spread the mint mixture evenly across the pan, making sure it covers the first layer completely. Return the pan to the fridge for another 10–15 minutes, just until it begins to firm up.
Step 4: Add the final chocolate layer
Now, melt the remaining cup of semi-sweet chocolate chips with the last tablespoon of butter. Stir until smooth and glossy. Let it cool slightly before pouring it over the mint layer. This cooling step is crucial because pouring hot chocolate on top could cause the mint layer to mix and lose its clean separation. Once cooled slightly, spread it evenly to create a smooth top finish.
Place the pan back in the refrigerator and let the mints chill for at least one hour, or until the layers are fully set. If you want an even cleaner texture, you can chill them overnight.
Step 5: Cut and serve
When the chocolate is completely set, lift it out of the pan using the parchment overhang and place it on a cutting board. Use a sharp knife that’s been dipped in hot water and wiped dry to slice the block into neat squares or rectangles. Warming the knife helps the chocolate cut cleanly without cracking.
Quick and Easy
This recipe might look fancy, but it’s surprisingly quick to make. The actual preparation takes only about 20 minutes; the rest is just chilling time. You can even make it while multitasking—melt one layer while the other chills. The simplicity makes it perfect for busy days or last-minute treats when you need something impressive fast.
Customizable
One of the best things about homemade Andes Mints is that they’re completely customizable. You can use milk chocolate instead of dark for a sweeter taste, or add a drop of vanilla extract to the mint layer for a smoother flavor. For a festive touch, color the mint layer pink for Valentine’s Day or pastel blue for winter holidays. You can even sprinkle crushed candy canes or edible glitter on top for a decorative finish.
Popular with Many People
These mints are always a hit at gatherings. Whether you’re hosting a dinner party, packaging them as gifts, or serving them after dessert, they disappear fast. Their cool mint flavor and creamy chocolate layers appeal to both kids and adults alike. They also make a wonderful homemade holiday gift when wrapped in decorative cellophane or placed in small tins.
Once you try making them, you’ll realize just how easy it is to create this elegant, refreshing treat at home. Every bite delivers that perfect balance of chocolate and mint that keeps everyone coming back for more.
PrintHomemade Andes Mint Chocolates

Homemade Andes Mints are a classic combination of smooth chocolate and refreshing mint, made even better from scratch. This easy, no-fuss recipe delivers perfectly layered candies that look elegant and taste divine. With just a few simple ingredients, you can create a treat that’s great for sharing, gifting, or enjoying after a meal.
- Prep Time: 20
- Total Time: 20 minutes
- Yield: 36 1x
Ingredients
- 2 cups semi-sweet chocolate chips (or dark chocolate, if preferred)
- 1 cup white chocolate chips
- 2 tablespoons butter, divided
- 1 teaspoon peppermint extract
- A few drops of green food coloring (optional)
- Parchment paper for layering
Instructions
- Prepare the pan: Line an 8×8-inch baking dish with parchment paper, leaving some overhang for easy removal later.
- Melt the first chocolate layer: Combine 1 cup semi-sweet chocolate chips and 1 tablespoon butter in a heatproof bowl. Melt in 20-second microwave intervals or over a double boiler, stirring until smooth. Spread evenly in the prepared pan and refrigerate for 10 minutes until slightly firm.
- Make the mint layer: In another bowl, melt white chocolate chips with the remaining tablespoon of butter. Stir in peppermint extract and add green food coloring if desired. Let it cool slightly, then pour over the first layer. Spread evenly and refrigerate for 10–15 minutes.
- Add the final chocolate layer: Melt the remaining semi-sweet chocolate with the same method. Allow it to cool slightly, then spread over the mint layer to form the top coating. Smooth the surface and refrigerate for at least 1 hour or until fully set.
- Cut into pieces: Lift the chocolate slab out of the pan using the parchment overhang. Slice into neat squares or rectangles with a sharp knife warmed in hot water for clean edges.
- Store: Place the mints in an airtight container and refrigerate. Separate layers with parchment if stacking.
Notes
To achieve clean layers, let each one cool slightly before adding the next.
Adjust peppermint extract to taste for a milder or stronger mint flavor.
For festive occasions, experiment with colored mint layers or decorative toppings.
FAQs
1. Can I use milk chocolate instead of semi-sweet chocolate?
Yes, absolutely. Milk chocolate creates a sweeter and creamier taste, while semi-sweet chocolate delivers a deeper flavor. Both work beautifully depending on your preference.
2. Can I make these mints without food coloring?
Of course. The green food coloring is purely optional. Without it, the middle layer will be a natural white color, and the flavor remains the same—fresh and minty.
3. How do I store homemade Andes Mints?
Store the mints in an airtight container in the refrigerator. They stay fresh for up to two weeks. If you plan to gift them or save them longer, you can freeze them for up to three months. Just separate the layers with parchment paper to prevent sticking.
4. Can I use peppermint oil instead of peppermint extract?
Yes, but peppermint oil is much stronger. Use only a few drops instead of a full teaspoon to avoid overpowering the flavor.
5. Why did my layers separate when cutting?
This usually happens when the layers weren’t fully set or if the chocolate cooled too much before layering. Be sure to let each layer firm slightly but remain tacky before adding the next, and chill the mints thoroughly before slicing.