
I still remember the first time I made Fruity Pebbles Cheesecake Tacos. It was on a quiet weekend, and I was craving something playful and indulgent. I wanted to take a nostalgic cereal from childhood and turn it into something bold, colorful, and undeniably delicious. That’s how this recipe was born – a fun twist on classic dessert tacos that combines crispy cereal shells with a rich, creamy cheesecake filling. Every bite is a blend of crunch, creaminess, and fruity sweetness that takes you right back to carefree mornings in front of the TV.
You’re going to absolutely love this recipe because it’s not just a dessert – it’s a conversation starter. It looks exciting, tastes incredible, and is perfect for celebrations, kids’ parties, brunches, or just when you want to treat yourself. The creamy filling balances the crunch of the shell, and the burst of fruity flavors from the cereal adds just the right amount of sweetness without being overpowering. Plus, these cheesecake tacos hold their shape well and stay firm even when filled, so they’re just as fun to serve as they are to eat.
What makes this recipe truly special is its versatility. You can top them with fresh fruit, a drizzle of white chocolate, whipped cream, or even crushed candy pieces. The cheesecake filling can be flavored with citrus zest, cocoa, or flavored extracts depending on your mood or event theme. You can even swap Fruity Pebbles for other colorful cereals if you like experimenting. This makes them ideal for customizing according to your preferences.
Another reason to love these cheesecake tacos is that they’re affordable. The ingredients are simple and accessible at any grocery store. With a few pantry staples and one or two special additions, you can whip up a dessert that looks impressive and tastes incredible – all without breaking the bank. Plus, since there’s no baking required for the filling, it’s easy and energy-efficient.
Here’s what you’ll need to bring these Fruity Pebbles Cheesecake Tacos to life:
Ingredients for the recipe:
-
2 cups Fruity Pebbles cereal
-
1 ½ cups mini marshmallows
-
2 tablespoons unsalted butter
-
8 oz cream cheese (softened)
-
1/3 cup powdered sugar
-
1 teaspoon vanilla extract
-
1 cup heavy whipping cream
-
Optional toppings: fresh berries, white chocolate drizzle, whipped cream
How to Prepare This Recipe
Making Fruity Pebbles Cheesecake Tacos is an incredibly fun and satisfying process. Not only is it visually exciting, but the flavors and textures also make it a standout dessert. The best part? It’s surprisingly simple to prepare and doesn’t require any baking. Let’s go through each step so you can recreate this dessert perfectly at home.
Step-by-Step Instructions for Preparation
Step 1: Prepare the cereal taco shells
Start by lining a clean surface or tray with parchment paper. In a medium saucepan, melt 2 tablespoons of unsalted butter over low heat. Once the butter is melted, add 1 ½ cups of mini marshmallows and stir continuously until completely melted and smooth. Turn off the heat as soon as the mixture is fully combined and glossy.
Immediately pour in 2 cups of Fruity Pebbles cereal, and stir until all the cereal is fully coated with the melted marshmallow mixture. Work quickly, as the mixture sets fast.
Scoop out spoonfuls of the mixture and press them onto an overturned muffin tin, gently shaping each portion into a half-circle taco shell. Let the cereal shells cool and firm up for about 10–15 minutes. Once they’re set, gently lift them off and set them aside.
Step 2: Make the cheesecake filling
In a mixing bowl, beat 8 oz of softened cream cheese using a hand mixer until smooth and creamy. Add 1/3 cup of powdered sugar and 1 teaspoon of vanilla extract. Continue to mix until fully incorporated and silky.
In a separate chilled bowl, whip 1 cup of heavy whipping cream until stiff peaks form. This helps create a light, fluffy texture for the cheesecake filling. Once whipped, gently fold the whipped cream into the cream cheese mixture in two batches. Be careful not to deflate the whipped cream.
Once fully combined, transfer the cheesecake filling to a piping bag or use a spoon if preferred. Chill the filling for 10–15 minutes to help it firm up before assembling the tacos.
Step 3: Assemble the tacos
Carefully pipe or spoon the cheesecake filling into each Fruity Pebbles shell. Fill generously, but don’t overfill – you want a nice balance between the crispy shell and creamy filling. Once filled, you can get creative with toppings.
Optional toppings include fresh berries, a drizzle of white chocolate, a swirl of whipped cream, or crushed candies. Each addition adds a new layer of texture and flavor that complements the fruity cereal and creamy filling.
Quick and Easy
This recipe is ideal when you’re short on time. It requires no baking, uses simple ingredients, and takes under 30 minutes from start to finish. The steps are straightforward, and the no-bake cheesecake filling means no long waiting times. It’s a perfect last-minute dessert for parties or casual get-togethers.
Customizable
Fruity Pebbles Cheesecake Tacos are highly adaptable. Want a citrus twist? Add lemon or orange zest to the cheesecake mixture. Prefer a richer version? Stir in a spoonful of melted white chocolate or swap the vanilla extract for almond extract. If you’re feeling adventurous, use different cereals like Cocoa Pebbles or Rice Krispies for a flavor change. You can even add food coloring to the cheesecake filling to match a holiday or party theme.
If you’re serving kids, keep it fun with colorful toppings. For adult events, keep it elegant with a dollop of whipped cream and a few fresh berries. This recipe can be transformed to suit any occasion.
Popular With Many People
There’s something universally appealing about this dessert. The cereal shell reminds people of childhood, while the cheesecake filling adds a rich, creamy layer of indulgence. Whether you’re hosting a birthday party, bridal shower, or holiday event, these cheesecake tacos are a hit across all age groups.
Guests will be intrigued by the presentation and delighted by the taste. And since they’re served individually, they’re easy to portion and even easier to enjoy. They hold their shape well and can be made ahead of time – making them practical for gatherings.
PrintFruity Pebbles Cheesecake Tacos

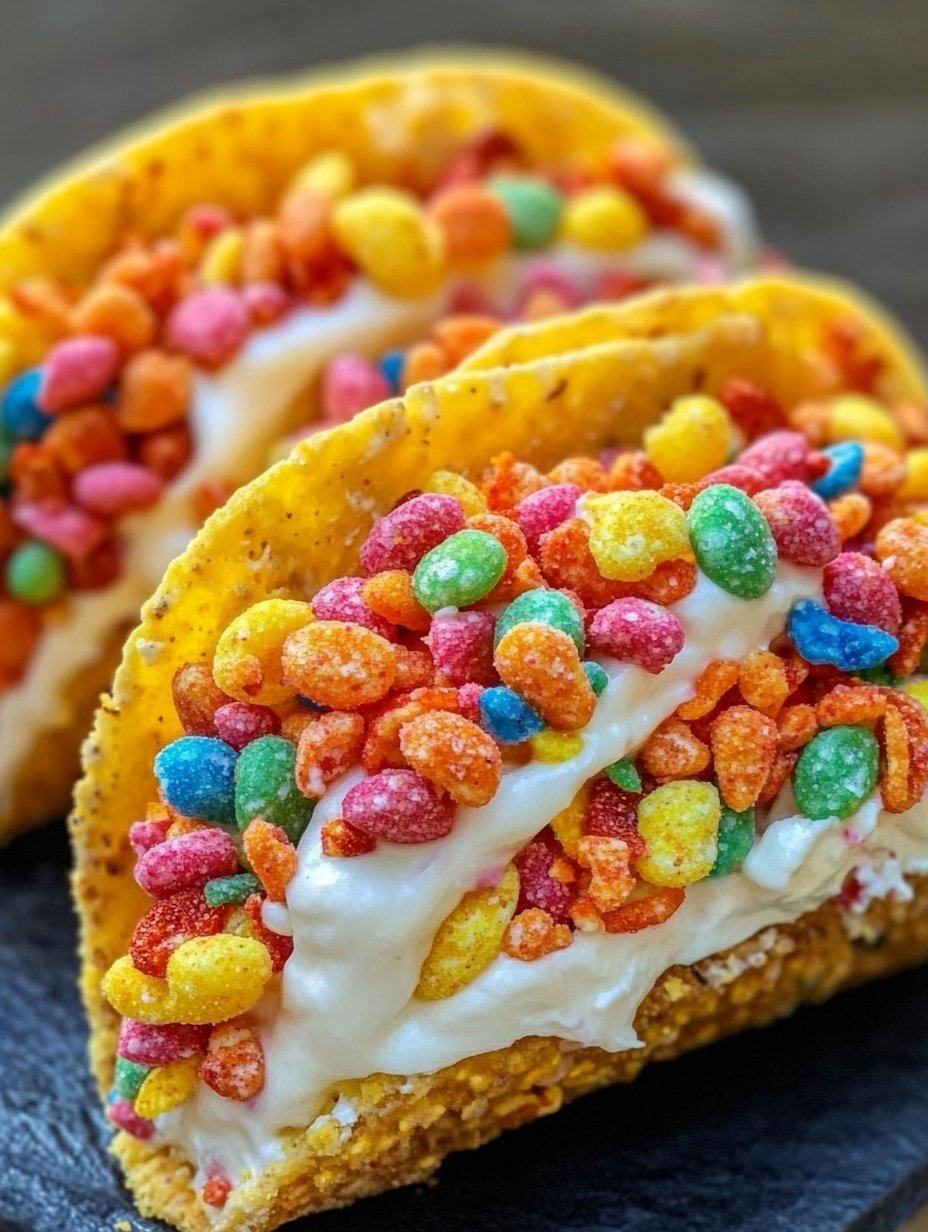
Fruity Pebbles Cheesecake Tacos are colorful, fun, and easy-to-make desserts that combine crispy cereal shells with a light, creamy cheesecake filling. Perfect for birthdays, brunches, and special occasions, they’re customizable and guaranteed to bring smiles to the table.
- Prep Time: 20
- Cook Time: 5
- Total Time: 25 minutes
- Yield: 8 1x
Ingredients
For the cereal taco shells:
- 2 cups Fruity Pebbles cereal
- 1 ½ cups mini marshmallows
- 2 tablespoons unsalted butter
For the cheesecake filling:
- 8 oz cream cheese (softened)
- 1/3 cup powdered sugar
- 1 teaspoon vanilla extract
- 1 cup heavy whipping cream
Optional toppings:
- Fresh berries
- White chocolate drizzle
- Whipped cream
- Crushed candy pieces
Instructions
- Prepare the taco shells:
In a saucepan over low heat, melt the butter. Add the mini marshmallows and stir constantly until fully melted. Remove from heat and quickly fold in the Fruity Pebbles cereal. Stir until evenly coated. - Shape the shells:
While still warm, scoop spoonfuls of the mixture and press them over the back of a muffin tin to form taco shapes. Let them cool and firm up for 10–15 minutes. Gently remove and set aside. - Make the filling:
In a mixing bowl, beat the softened cream cheese until smooth. Add the powdered sugar and vanilla extract. Beat again until creamy. - Whip the cream:
In a separate chilled bowl, whip the heavy cream until stiff peaks form. Carefully fold the whipped cream into the cream cheese mixture in batches, mixing gently until smooth and fluffy. Chill for 10–15 minutes. - Assemble the tacos:
Pipe or spoon the cheesecake filling into each taco shell. Add desired toppings, such as fresh fruit or a drizzle of melted white chocolate. Serve immediately or chill for a firmer texture.
Notes
Work quickly when shaping the cereal shells, as the mixture sets fast.
Chill the filling for best results before piping.
Do not overfill the shells to maintain structure and presentation.
These are best enjoyed the same day they are made.
FAQs
Can I make the Fruity Pebbles taco shells in advance?
Yes, you can prepare the cereal shells up to one day in advance. Store them in an airtight container at room temperature to keep them crisp. Avoid refrigerating the shells, as moisture can make them soft.
How long does the cheesecake filling last?
The cheesecake filling can be made up to 2 days ahead and stored in the refrigerator in an airtight container. It should be piped or spooned into the shells just before serving to maintain the texture of the shell.
Can I freeze these cheesecake tacos?
Freezing is not recommended. The cereal shells may become soggy when thawed, and the whipped cream in the cheesecake filling may separate. For the best texture, prepare and serve them fresh.
Can I use other cereals instead of Fruity Pebbles?
Absolutely. This recipe is very flexible. You can substitute Fruity Pebbles with Cocoa Pebbles, Rice Krispies, or any other crisp cereal. Just make sure the cereal binds well with the marshmallow mixture for a sturdy shell.
Is there a non-dairy version of this recipe?
Yes. You can substitute the cream cheese and whipping cream with plant-based alternatives. Just be sure they’re made for whipping and setting, to hold the taco shape properly.