
Imagine sinking your teeth into a soft, moist cake pop, with a rich chocolate coating that melts in your mouth while the sweet icing oozes out like a delicious surprise. The delightful blend of flavors dances on your palate, making every bite an experience you won’t soon forget.
I remember the first time I attempted to make cake pops for a Halloween party. Let’s just say my kitchen looked like a crime scene involving frosting and sprinkles, and instead of spooky treats, I ended up with something resembling abstract art. But those quirky creations stole the show! Now, I’m here to share my upgraded recipe for Eyeball Cake Pops—no mess, no stress, and no abstract disasters.
What Makes This Recipe Special
These Eyeball Cake Pops are not just easy to whip up but also boast a unique flavor profile that combines chocolatey goodness with a hint of vanilla creamy filling. Their stunning appearance makes them perfect for parties or any festive gathering, with the added bonus of being customizable; you can switch up the colors and toppings to suit any occasion!
Ingredients for Eyeball Cake Pops
Here’s what you need for this delicious dish:
Complete Preparation Method Eyeball Cake Pops
Simply follow these easy steps to prepare this delicious meal:
Step 1: Bake Your Cake
Preheat your oven to 350°F (175°C). In a large mixing bowl, combine one box of chocolate cake mix, three large eggs, half a cup of vegetable oil, and one cup of water. Beat on medium speed until well combined—aim for about two minutes. Pour the batter into a greased 9×13 inch baking pan and bake according to package instructions or until a toothpick inserted comes out clean (usually around 25-30 minutes). Allow it to cool completely.
Step 2: Crumble Your Cake
Once cooled, crumble the cake into fine crumbs in a large bowl using your hands or a fork. The texture should resemble sandcastles at low tide—fine yet sturdy enough to mold.
Step 3: Mix in Frosting
Add about one cup of vanilla frosting to your crumbled cake mixture. Using your hands (yes, get messy!), mix everything together until it forms a dough-like consistency that can hold its shape when rolled into balls.
Step 4: Shape into Balls
Using your hands, scoop out small portions of the mixture and roll them into 1-inch balls—think golf ball size but without any swinging involved! Place them on a baking sheet lined with parchment paper as you go.
Step 5: Chill Your Cake Balls
Pop those formed cake balls in the freezer for about 30 minutes. This step is crucial as it allows them to firm up so they won’t fall apart during dipping later on.
Step 6: Dip in Chocolate
Melt about two cups of white chocolate melts according to package instructions (usually done via microwave in short bursts). Once melted and smooth, add food coloring if desired—mix thoroughly until you achieve that perfect shade of creepy! Take each chilled cake ball and dip it into the melted chocolate using a fork or skewer. Tap off excess chocolate before placing it back onto parchment paper.
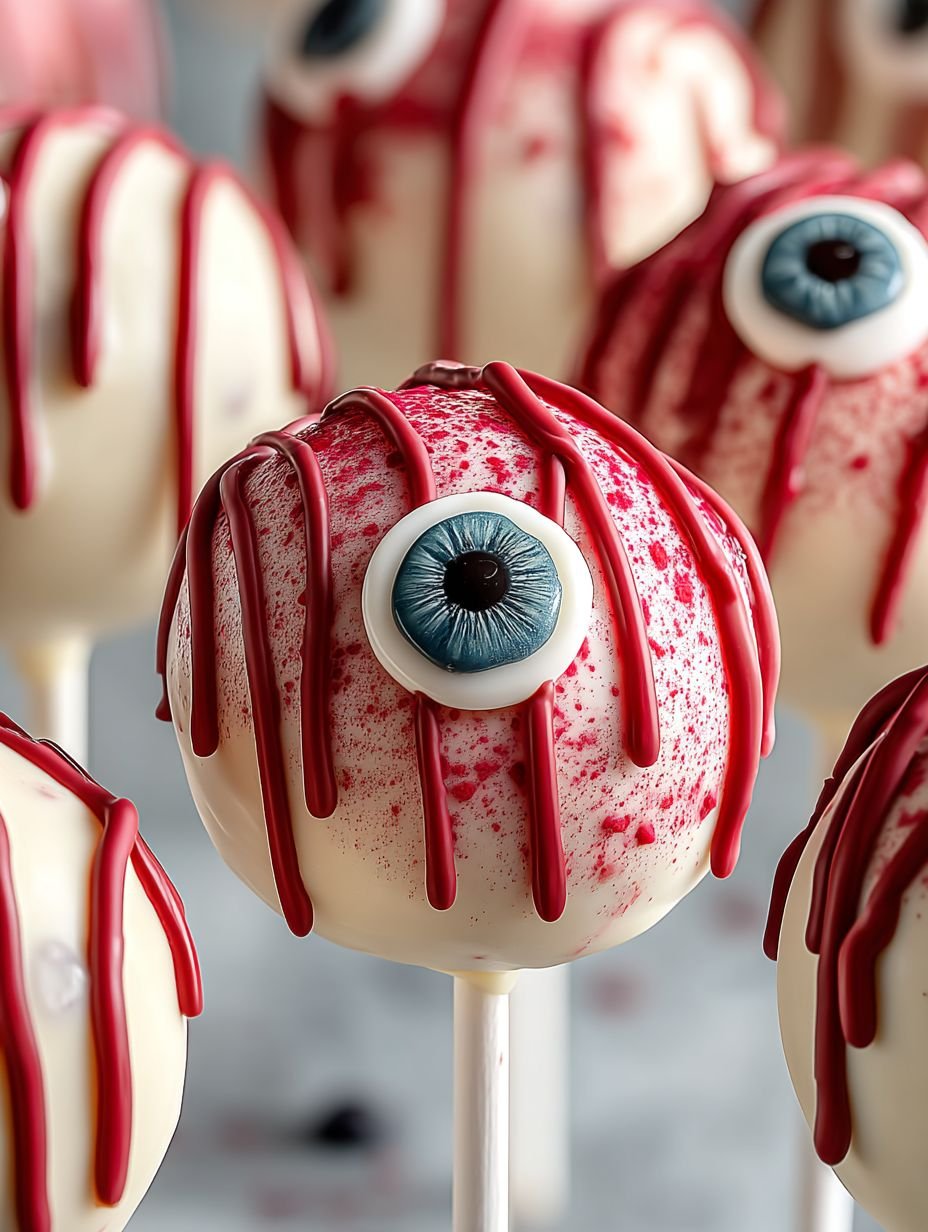
Step 7: Add Candy Eyes
Before the coating sets fully (while it’s still wet), place candy eyes onto each eyeball—get creative here! You can arrange them looking in different directions for added spookiness.
Step 8: Allow to Set
Let the dipped Eyeball Cake Pops sit at room temperature until completely set (about an hour), or place them in the fridge for quicker results.
Serve with flair! Display these creepy delights on a spooky platter at your next gathering or Halloween bash. Garnish with fake spider webs (cotton candy works!) or serve them alongside some ghoulishly good treats like ghost-shaped cookies! Enjoy your monstrous creation while trying not to laugh too loudly—it might scare someone away from dessert!
Mastering the Secrets of Cooking
For perfect Eyeball Cake Pops, mix your cake crumbs and frosting thoroughly, ensuring no lumps remain. Shape them into even balls before chilling to help maintain their form during coating.
Make Your Recipe Unique
Get creative with your Eyeball Cake Pops! Swap out Golden Oreos for chocolate sandwich cookies for a richer flavor or use blueberries instead of strawberries for a juicy twist.
Smart Storage & Reheating
To keep your Eyeball Cake Pops fresh, store them in an airtight container in the fridge. This helps maintain their moisture. Enjoy them within a week for best texture and flavor.
The Chef’s Golden Tips

I remember making these Eyeball Cake Pops for a Halloween party, and watching my friends’ faces light up was priceless! They were both horrified and delighted at the same time.
Conclusion for Eyeball Cake Pops
Creating Eyeball Cake Pops is a delightful way to impress friends and family with your baking skills. This fun and festive treat not only looks spooky but is also made from simple, accessible ingredients. The combination of moist cake with creamy frosting and a delicious candy coating will satisfy any sweet tooth. Plus, they are perfect for parties or seasonal gatherings. Don’t miss the chance to make these eye-catching desserts! Gather your ingredients and give this recipe a try—your guests will love them!
PrintEyeball Cake Pops

Delicious eyeball cake pops recipe with detailed instructions and nutritional information.
- Prep Time: 30 minutes
- Cook Time: 45 minutes
- Total Time: 1 hour 15 minutes
- Yield: 12 servings 1x
- Method: Bake
Ingredients
- 1 box chocolate cake mix
- 3 large eggs, room temperature
- 1/2 cup vegetable oil
- 1 cup water
- 1 cup vanilla frosting, with real vanilla extract
- 2 cups white chocolate melts
- Food coloring (red or green)
- Candy eyes
Instructions
- Preheat your oven to 350°F (175°C).
- In a large mixing bowl, combine one box of chocolate cake mix, three large eggs, half a cup of vegetable oil, and one cup of water.
- Beat on medium speed until well combined for about two minutes.
- Pour the batter into a greased 9×13 inch baking pan and bake according to package instructions or until a toothpick inserted comes out clean.
- Allow the cake to cool completely.
- Once cooled, crumble the cake into fine crumbs in a large bowl using your hands or a fork.
- Add about one cup of vanilla frosting to your crumbled cake mixture.
- Using your hands, mix everything together until it forms a dough-like consistency that can hold its shape when rolled into balls.
- Using your hands, scoop out small portions of the mixture and roll them into 1-inch balls.
- Place the cake balls on a baking sheet lined with parchment paper as you go.
- Pop the formed cake balls in the freezer for about 30 minutes.
- Melt about two cups of white chocolate melts according to package instructions.
- Once melted and smooth, add food coloring if desired and mix thoroughly.
- Take each chilled cake ball and dip it into the melted chocolate using a fork or skewer.
- Tap off excess chocolate before placing it back onto parchment paper.
- Before the coating sets fully, place candy eyes onto each eyeball.
- Let the dipped Eyeball Cake Pops sit at room temperature until completely set or place them in the fridge for quicker results.
Notes
Store cake pops in airtight containers.
Reheat gently in the microwave.
Serve with a spooky platter display.
Use colored candy melts for fun!
Nutrition
- Calories: 150 kcal
- Sugar: 8g
- Sodium: 50mg
- Fat: 6g
- Carbohydrates: 22g
- Fiber: 3g
- Protein: 2g
- Cholesterol: 25mg
FAQs
What type of cake is best for Eyeball Cake Pops?
For Eyeball Cake Pops, a moist vanilla or chocolate cake works wonderfully. Both flavors provide a great base to pair with the frosting and candy coating. Choose your favorite or mix and match for added variety. The key is ensuring the cake remains soft enough to easily combine with frosting for shaping into eyeballs.
How do I store leftover Eyeball Cake Pops?
To store leftover Eyeball Cake Pops, place them in an airtight container at room temperature for up to three days. If you need to keep them longer, refrigerate them for up to a week. Make sure they are separated by parchment paper to prevent sticking. Let them sit at room temperature before serving for the best texture.
Can I use different colors of candy coating for my Eyeball Cake Pops?
Absolutely! You can use various colors of candy coating to create fun and unique designs for your Eyeball Cake Pops. Feel free to experiment with colors like green or purple for a more playful twist. Just ensure that the coatings are melted properly for easy dipping.
How can I make my Eyeball Cake Pops look more realistic?
To achieve a more realistic look for your Eyeball Cake Pops, you can use food coloring gel to enhance the details on the candy coating. Use a small brush or toothpick to add splatters or lines resembling veins around the eyeball. Additionally, using colored icing for the iris can further enhance their appearance!