
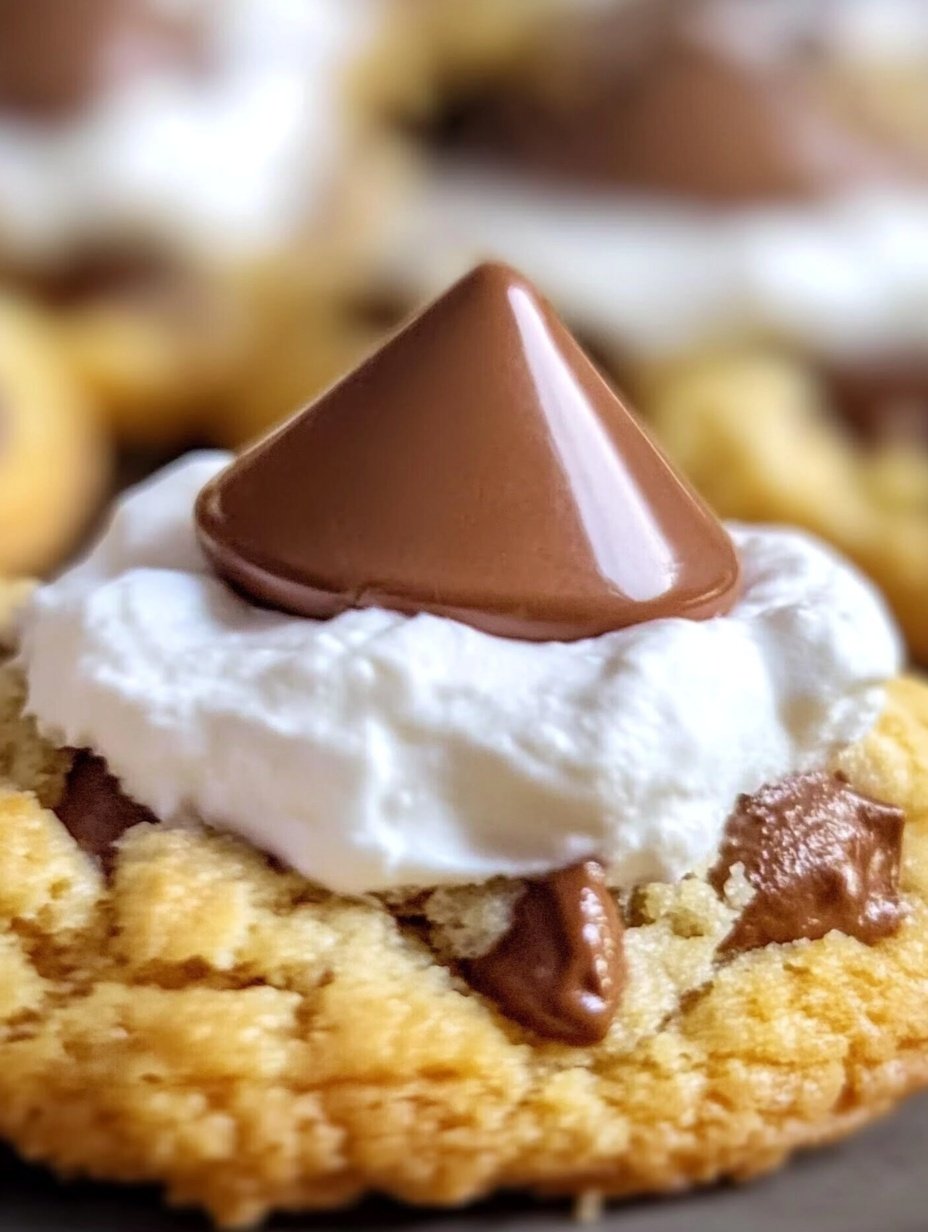
When I think back to my childhood summers, one of my favorite memories is sitting around a campfire with family, toasting marshmallows and layering them between graham crackers and chocolate bars. That nostalgic treat has always been a symbol of togetherness, joy, and simple indulgence. As a baker, I love capturing those timeless flavors in creative ways, and that is how these Hershey S’mores Kiss Cookies came to life. Instead of needing a fire pit or camping trip, you can now enjoy the classic s’mores taste baked into soft, chewy cookies, complete with the irresistible touch of a Hershey’s Kiss on top. These cookies blend tradition with convenience, and every bite feels like a sweet reminder of cozy nights and shared laughter.
You will love this recipe because it offers everything you crave in a dessert: gooey marshmallow sweetness, crunchy graham cracker crumbs, and the smooth richness of chocolate. The Hershey’s Kiss at the center not only makes the cookies beautiful but also provides that perfect burst of flavor. Unlike ordinary cookies, these are layered with textures and flavors that keep you coming back for more.
Another reason this recipe stands out is its versatility. While the base combination remains true to the spirit of s’mores, you can customize it to fit your taste. Swap out the chocolate flavor by using different varieties of Hershey’s Kisses, try flavored marshmallows for a fun twist, or add a sprinkle of cinnamon or nutmeg for a warm, spiced version. These cookies work beautifully for holidays, bake sales, family gatherings, or just as a weekday treat. Because they capture the magic of s’mores in cookie form, they suit both children and adults perfectly.
Affordability is another highlight of this recipe. The ingredients are all pantry-friendly and budget-conscious, with no need for expensive or hard-to-find items. Graham crackers, marshmallows, Hershey’s Kisses, and basic baking staples are all you need. Even better, this recipe makes a generous batch of cookies, ensuring you can share them with friends and family without spending much. It proves that memorable, delightful desserts do not need to cost a fortune.
Ingredients for the Recipe
-
1 cup unsalted butter, softened
-
¾ cup granulated sugar
-
¾ cup brown sugar, packed
-
2 large eggs
-
1 teaspoon vanilla extract
-
2 ½ cups all-purpose flour
-
1 teaspoon baking soda
-
½ teaspoon baking powder
-
½ teaspoon salt
-
1 ½ cups graham cracker crumbs
-
1 cup mini marshmallows
-
36 Hershey’s Kisses (unwrapped)
How to Prepare This Recipe
The beauty of these Hershey S’mores Kiss Cookies is how quickly and easily they come together. You don’t need any special equipment, and the steps are straightforward enough for even beginner bakers. What you end up with is a tray of cookies that taste like a campfire classic in every bite. Below, I’ll walk you through the entire process with step-by-step instructions so you can bake them confidently and enjoy perfect results each time.
Step-by-Step Instructions for Preparation
Step 1: Prepare your baking area
Start by preheating your oven to 350°F (175°C). Line two baking sheets with parchment paper or silicone baking mats. This helps prevent the cookies from sticking and makes cleanup much easier. Set out your ingredients so everything is within easy reach.
Step 2: Cream the butter and sugars
In a large mixing bowl, add the softened unsalted butter, granulated sugar, and brown sugar. Using a hand mixer or stand mixer, beat them together until the mixture is light and fluffy. This usually takes about two to three minutes. Properly creaming the butter and sugar ensures that your cookies bake up with the right texture and sweetness.
Step 3: Add eggs and vanilla
Crack in the eggs one at a time, mixing well after each addition. Then add the vanilla extract and continue beating until everything is well combined. At this stage, the mixture should be smooth and creamy.
Step 4: Combine dry ingredients
In a separate bowl, whisk together the all-purpose flour, baking soda, baking powder, and salt. This helps evenly distribute the leavening agents so your cookies rise properly in the oven.
Step 5: Blend dry and wet ingredients
Gradually add the dry ingredients to the butter mixture, mixing slowly until just combined. Do not overmix, as this can make the cookies dense instead of soft and chewy.
Step 6: Add graham crackers and marshmallows
Stir in the graham cracker crumbs and mini marshmallows. Fold them into the dough with a spatula until they are evenly distributed. The marshmallows will melt slightly while baking, giving the cookies a gooey texture that mimics a true s’more.
Step 7: Shape the dough
Scoop about one tablespoon of dough at a time and roll it into balls. Place them two inches apart on the prepared baking sheets to allow room for spreading.
Step 8: Bake the cookies
Bake each tray in the preheated oven for 8 to 10 minutes. Keep an eye on them — you want the edges to be golden brown while the centers remain soft. The marshmallows may peek out and caramelize slightly, adding even more flavor.
Step 9: Add Hershey’s Kisses
Once the cookies come out of the oven, let them sit for about one minute to set. Then, gently press one unwrapped Hershey’s Kiss into the center of each cookie. The residual heat will slightly melt the chocolate, securing it perfectly into place. Allow the cookies to cool on the baking sheet for five minutes before transferring them to a wire rack.
Quick and Easy
What makes this recipe so appealing is its simplicity. From mixing to baking, the entire process takes less than 30 minutes. There’s no need to chill the dough, and cleanup is minimal, making it ideal for busy schedules. Even on a weekday evening, you can whip up a batch and enjoy them fresh out of the oven.
Customizable
Another strength of these cookies is how easily you can adapt them. Try using different flavors of Hershey’s Kisses, such as milk chocolate, dark chocolate, or even caramel-filled varieties, to add variety. You could also mix in white chocolate chips or peanut butter chips alongside the marshmallows. If you want a festive version, swap the mini marshmallows for colorful holiday marshmallows or sprinkle crushed peppermint candies on top. The base recipe remains reliable while offering endless room for creativity.
Popular with Many People
Because these cookies combine three classic elements — chocolate, marshmallow, and graham crackers — they appeal to almost everyone. They are especially popular with kids, but adults love the nostalgic flavors as well. I often bake them for parties, potlucks, or bake sales, and they are always among the first treats to disappear. The presentation is also charming, with the Hershey’s Kiss shining in the center, making them both fun and eye-catching.
PrintEasy Hershey S’mores Kiss Cookies Recipe

These Hershey S’mores Kiss Cookies capture the nostalgic flavor of classic campfire s’mores in a soft, chewy cookie. Made with graham cracker crumbs, gooey marshmallows, and topped with a Hershey’s Kiss, they are simple to bake and perfect for sharing.
- Prep Time: 15
- Cook Time: 10
- Total Time: 25 minutes
- Yield: 36 1x
Ingredients
- 1 cup unsalted butter, softened
- ¾ cup granulated sugar
- ¾ cup brown sugar, packed
- 2 large eggs
- 1 teaspoon vanilla extract
- 2 ½ cups all-purpose flour
- 1 teaspoon baking soda
- ½ teaspoon baking powder
- ½ teaspoon salt
- 1 ½ cups graham cracker crumbs
- 1 cup mini marshmallows
- 36 Hershey’s Kisses (unwrapped)
Instructions
- Preheat the oven to 350°F (175°C). Line two baking sheets with parchment paper or silicone baking mats.
- In a large bowl, cream together the softened butter, granulated sugar, and brown sugar until light and fluffy.
- Add the eggs one at a time, mixing well after each addition. Stir in the vanilla extract.
- In another bowl, whisk together the flour, baking soda, baking powder, and salt.
- Gradually add the dry mixture to the butter mixture, stirring until just combined.
- Fold in the graham cracker crumbs and mini marshmallows until evenly distributed.
- Roll the dough into tablespoon-sized balls and place them two inches apart on the baking sheets.
- Bake for 8–10 minutes, or until the edges are golden brown but the centers remain soft.
- Remove the cookies from the oven and let them sit for one minute. Gently press one Hershey’s Kiss into the center of each cookie.
- Allow the cookies to cool on the baking sheet for five minutes, then transfer to a wire rack to cool completely.
Notes
For variety, try different Hershey’s Kiss flavors, such as dark chocolate or caramel-filled.
If graham crackers are not available, crushed digestive biscuits can be used as a substitute.
To prevent overmelting of marshmallows, avoid overbaking and remove cookies as soon as edges are golden.
FAQs
Can I make these cookies ahead of time?
Yes, you can prepare the dough a day in advance and store it covered in the refrigerator. When ready to bake, let the dough rest at room temperature for about 15 minutes before shaping and baking. You can also bake the cookies completely, then store them in an airtight container for up to five days.
Do these cookies freeze well?
Absolutely. Once baked and cooled, place the cookies in a freezer-safe container or bag. They can be frozen for up to two months. To enjoy, let them thaw at room temperature or warm them slightly in the microwave for a just-baked texture.
Can I substitute the Hershey’s Kisses with another chocolate?
Yes, the recipe works well with other chocolates. You can try chocolate squares, chocolate truffles, or even flavored kisses for variety. Each option adds a slightly different flavor, but the cookies remain delicious.
What if I don’t have graham crackers?
If graham crackers are unavailable, you can use digestive biscuits or other mild-flavored cookies. Simply crush them into fine crumbs and use them in the same way.
How do I keep the marshmallows from melting too much?
Marshmallows naturally melt in the oven, but to keep them visible and soft, avoid overbaking the cookies. Removing the tray as soon as the edges are golden helps maintain their gooey texture.