
There’s something undeniably satisfying about the taste of a perfectly crafted cheeseburger slider. I still remember the first time I made these for a family gathering—how quickly they disappeared from the tray! These little bites of joy bring together everything we love about a juicy burger but in a smaller, easier-to-enjoy size. Whether you’re preparing them for a party, a family dinner, or a casual weekend meal, cheeseburger sliders always find their way into everyone’s heart.
What I adore about these sliders is their versatility. They fit beautifully into any occasion, from game nights to picnics, from potlucks to quick weeknight dinners. You can serve them as appetizers, main dishes, or even pack them for a lunchbox treat. They’re so convenient and fun that you’ll find yourself making them over and over again.
Another reason to love this recipe is how affordable it is. You don’t need expensive ingredients or complicated tools. A few simple items—ground beef, cheese, soft slider buns, and basic condiments—come together to make something incredibly delicious. With minimal effort and budget-friendly ingredients, you can create a dish that feels gourmet and indulgent.
These cheeseburger sliders are also perfect for customization. You can easily adapt them to your taste. Add your favorite toppings like lettuce, tomato, pickles, or grilled onions. Switch up the cheese with cheddar, Swiss, or even pepper jack for a spicy twist. You can make them classic, smoky, or even add a tangy sauce to create your signature version.
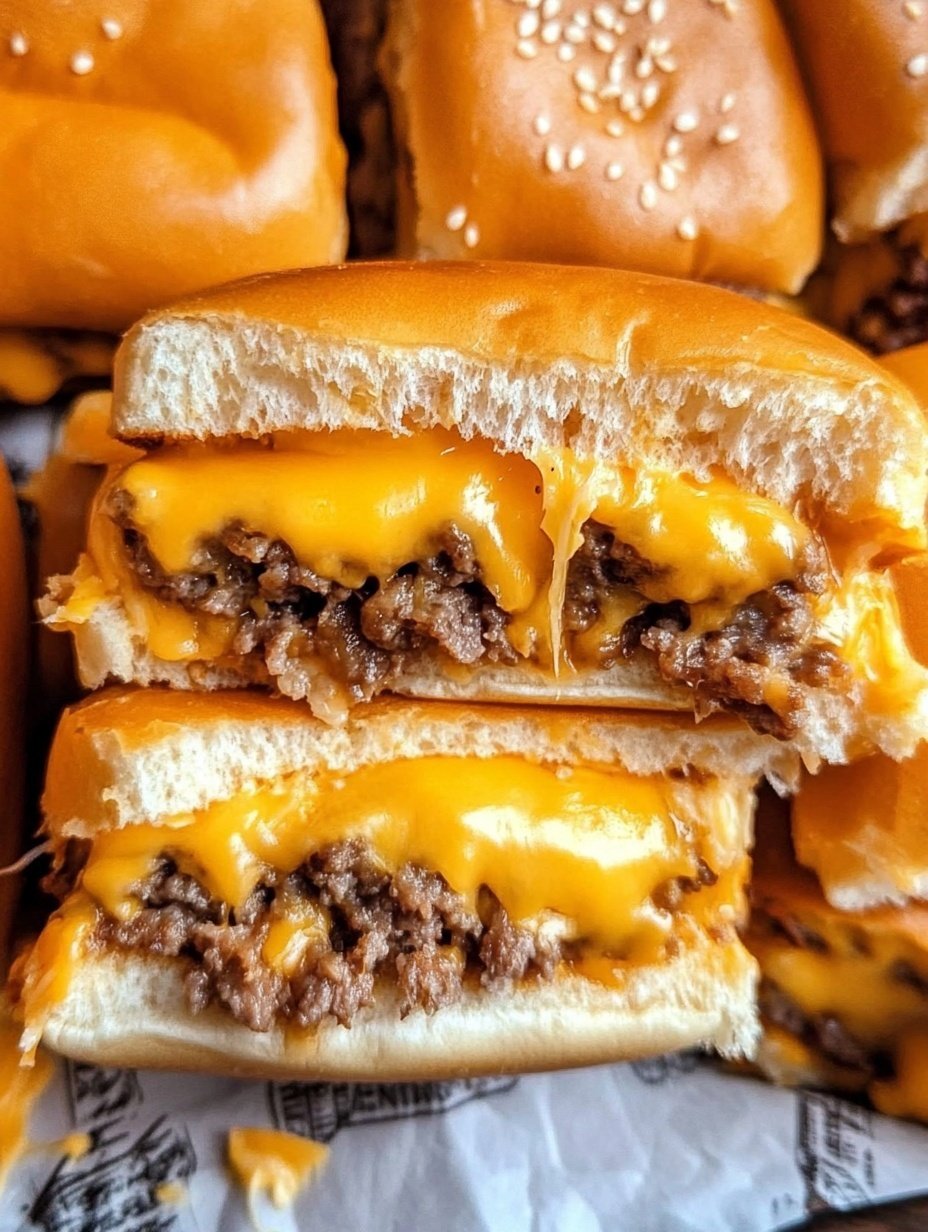
The aroma of the sizzling beef on the skillet, the melting cheese over the patties, and the warm buns coming together make this recipe truly irresistible. Every bite bursts with flavor, offering the perfect balance of juicy meat, melted cheese, and soft bread. It’s a crowd-pleaser that never fails to impress.
When I make cheeseburger sliders, I like to prepare them in batches, especially when I’m hosting guests. They’re quick to assemble, easy to serve, and guaranteed to disappear fast. It’s always amazing to see how such a simple recipe can bring so much happiness to the table.
Ingredients for Cheeseburger Sliders
-
500 g ground beef (or ground turkey for a lighter option)
-
1 teaspoon salt
-
½ teaspoon black pepper
-
1 teaspoon garlic powder
-
1 teaspoon onion powder
-
1 tablespoon olive oil or butter
-
6–8 slider buns
-
6–8 slices cheddar cheese (or any cheese of your choice)
-
1 small onion, finely chopped (optional)
-
1 tomato, thinly sliced
-
Lettuce leaves
-
Pickles, sliced
-
Ketchup, mayonnaise, or your preferred burger sauce
How to Prepare Cheeseburger Sliders
Making cheeseburger sliders is one of the most enjoyable cooking experiences because it’s quick, simple, and always rewarding. I love how effortless the process is, yet the result looks and tastes like something straight out of a restaurant kitchen. The following steps will guide you through making perfectly juicy, cheesy, and soft sliders that everyone will love.
Step-by-Step Instructions for Preparation
Step 1: Prepare the ground beef mixture
Start by placing the ground beef in a large mixing bowl. Add the salt, black pepper, garlic powder, and onion powder. Mix everything gently using your hands or a spoon until all the seasonings are evenly distributed. It’s important not to overmix the meat because that can make the patties dense instead of juicy.
Step 2: Shape the slider patties
Once the mixture is ready, divide it into equal portions. Each patty should be slightly larger than the size of your slider bun because it will shrink a bit during cooking. You can use a kitchen scale or your hands to shape uniform patties, about 5–6 cm in diameter. Place the shaped patties on a plate or tray lined with parchment paper and refrigerate them for 10–15 minutes to firm up before cooking. This step helps them hold their shape.
Step 3: Heat the skillet or griddle
Set a non-stick skillet or griddle over medium-high heat. Add the olive oil or butter and let it heat up until shimmering. You want the surface hot enough to sear the patties, locking in the juices and creating a delicious crust.
Step 4: Cook the patties
Place the patties onto the hot skillet and let them cook for about 2–3 minutes per side. Press lightly with a spatula to ensure even browning, but avoid pressing too hard, as it can release the juices. Once you flip the patties, place a slice of cheese on top of each one. Let the cheese melt as the patties finish cooking. This step fills the kitchen with that irresistible cheesy aroma that always makes everyone hungry.
Step 5: Toast the slider buns
While the patties cook, lightly toast the slider buns. You can do this in the same skillet or in the oven for a minute or two. Toasting gives them a subtle crispness while keeping the inside soft, creating the perfect base for your sliders.
Step 6: Assemble the sliders
Spread a thin layer of your favorite sauce—ketchup, mayonnaise, or a homemade burger sauce—on the bottom half of each bun. Place a lettuce leaf and a tomato slice, followed by the hot, cheesy patty. Add a few pickle slices if you like a tangy crunch. Cover with the top bun and press gently to hold everything together.
Step 7: Serve and enjoy
Serve your cheeseburger sliders immediately while they’re warm and the cheese is still gooey. You can arrange them on a platter for sharing or serve them individually with fries, salad, or sweet potato wedges.
Quick and Easy
This recipe comes together quickly, making it ideal for busy days. You can prepare the patties in advance and refrigerate them until ready to cook. The cooking time is short, and the sliders can be assembled in minutes. It’s the kind of recipe you’ll keep returning to because of its simplicity and delicious results.
Customizable
One of the best things about these sliders is how easy they are to customize. You can experiment with different types of cheese such as mozzarella, provolone, or pepper jack. If you prefer a leaner option, replace the ground beef with ground turkey or chicken. For a smoky flavor, add grilled onions or a light BBQ sauce. You can even prepare vegetarian sliders by using plant-based patties while keeping the same toppings and sauces.
Popular with Many People
Cheeseburger sliders are always a hit, no matter who you serve them to. They appeal to both adults and kids because they’re small, flavorful, and fun to eat. Guests love that they can enjoy one or two without feeling too full, and hosts appreciate how easy they are to prepare in large batches. These sliders often become the highlight of any meal, and once you make them, you’ll understand why everyone keeps asking for more.
Every time I make these, I’m reminded that great food doesn’t have to be complicated. A few fresh ingredients, a little time, and some care are all it takes to create something that brings people together. Cheeseburger sliders are proof that simple recipes can make unforgettable moments at the table.
PrintBEST RECIPE for Mini Big Mac Cheeseburgers

These cheeseburger sliders are small, juicy, and loaded with flavor. They are perfect for family dinners, parties, or any casual gathering. The combination of seasoned beef, melted cheese, and soft toasted buns creates a mouthwatering experience that everyone enjoys. Easy to make, affordable, and customizable, this recipe is a guaranteed crowd-pleaser.
- Prep Time: 15
- Cook Time: 10
- Total Time: 25 minutes
- Yield: 8 1x
Ingredients
- 500 g ground beef (or ground turkey for a lighter version)
- 1 teaspoon salt
- ½ teaspoon black pepper
- 1 teaspoon garlic powder
- 1 teaspoon onion powder
- 1 tablespoon olive oil or butter
- 6–8 slider buns
- 6–8 slices cheddar cheese (or your preferred cheese)
- 1 small onion, finely chopped (optional)
- 1 tomato, thinly sliced
- Lettuce leaves
- Pickles, sliced
- Ketchup, mayonnaise, or burger sauce
Instructions
- Prepare the beef mixture: Place the ground beef in a large mixing bowl. Add salt, black pepper, garlic powder, and onion powder. Mix gently until all ingredients are combined evenly. Avoid overmixing to keep the patties tender.
- Shape the patties: Divide the beef mixture into 6–8 equal portions. Shape each into a small patty slightly larger than the slider bun. Place them on a parchment-lined tray and refrigerate for about 10–15 minutes.
- Heat the skillet: Set a non-stick skillet or griddle over medium-high heat. Add olive oil or butter and let it heat until shimmering.
- Cook the patties: Place the patties on the hot surface. Cook each side for 2–3 minutes until browned and cooked through. When flipping, place a slice of cheese on top of each patty and allow it to melt.
- Toast the buns: While the patties finish cooking, lightly toast the slider buns in the skillet or oven for 1–2 minutes until golden.
- Assemble the sliders: Spread ketchup, mayonnaise, or sauce of your choice on the bottom half of each bun. Add a lettuce leaf, a tomato slice, and the hot, cheesy patty. Top with pickles and cover with the top bun.
- Serve: Serve immediately while warm. Arrange them on a serving platter and enjoy with fries, salad, or any side dish of your choice.
Notes
Do not press the patties while cooking; it helps retain their juiciness.
Toasting the buns adds texture and prevents them from getting soggy.
You can double the recipe for large gatherings or parties.
For extra flavor, sauté onions before adding them to the sliders.
FAQs
Can I make cheeseburger sliders ahead of time?
Yes, you can prepare the patties a day in advance and store them in the refrigerator. When ready to serve, cook them fresh so they stay juicy. You can also cook the patties ahead, refrigerate them, and reheat gently in a skillet before assembling.
Can I bake the sliders instead of pan-frying them?
Absolutely. To bake, preheat your oven to 190°C (375°F). Place the patties on a parchment-lined baking tray and bake for 10–12 minutes, flipping halfway through. Add cheese slices during the final minute to melt perfectly. This method is great for making large batches quickly.
How can I keep the sliders from getting soggy?
To keep them from becoming soggy, lightly toast the buns before assembling. This step adds a protective layer that prevents sauces or juices from soaking in. Also, avoid overloading with too many wet toppings.
Can I freeze cheeseburger sliders?
Yes, these sliders freeze very well. You can freeze the uncooked patties in a single layer, then transfer them to a freezer bag. When ready to use, thaw them in the fridge overnight and cook as usual. Cooked patties can also be frozen and reheated later for a quick meal.
What side dishes go best with cheeseburger sliders?
They pair beautifully with fries, potato wedges, coleslaw, onion rings, or a fresh salad. For gatherings, you can also serve them alongside dips or finger foods for a complete spread.
Can I use different sauces or cheeses?
Definitely. These sliders are very flexible. Try cheddar for a classic taste, mozzarella for a milder flavor, or pepper jack for a spicy twist. You can switch sauces too—ketchup, mayonnaise, BBQ sauce, or even a tangy yogurt dressing all work wonderfully.