
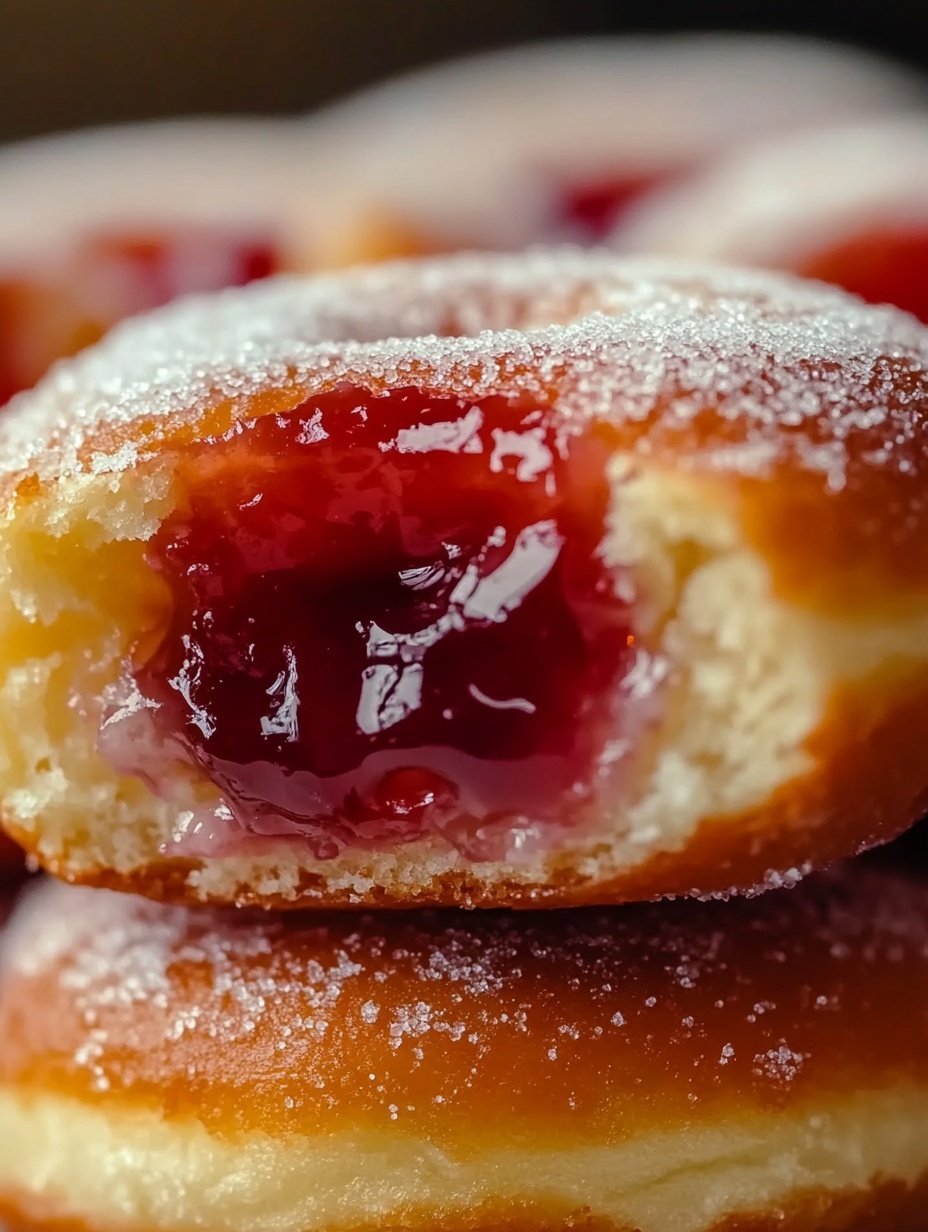
Ever since I first baked a batch of these jelly-filled donuts, they’ve been an instant hit in my kitchen. Unlike the traditional fried version, these donuts are baked, making them a slightly healthier alternative without compromising on flavor or texture. The golden-brown exterior is soft and tender, and the sweet jelly center bursts with fruity goodness in every bite. Whether I’m baking them for a weekend brunch, a school event, or just to enjoy with a cup of tea, these baked donuts always find their way back into my oven—and my heart.
What I love most about these donuts is how they combine the comforting flavors of a classic pastry with a more modern, health-conscious twist. The warm aroma of freshly baked dough, paired with the delightful surprise of sweet jelly inside, is simply irresistible. I remember the first time I served these to my family—no one could believe they weren’t fried. They disappeared in minutes, and I was left with requests for more.
Why You Will Love This Recipe
You’ll fall in love with this recipe for several reasons. First, it’s baked, not fried—so it’s lighter and less greasy, perfect for those looking for a more wholesome treat. Second, the dough is incredibly soft and easy to work with, resulting in donuts that are fluffy and tender every time. The jelly filling adds a nostalgic, sweet center that will transport you right back to childhood.
Versatile
These baked jelly donuts can easily be customized with different fillings. I like to use strawberry or raspberry jelly, but you can try apricot, blueberry, or even a smooth chocolate spread if you’re feeling indulgent. The dough itself is neutral enough to pair well with a variety of fillings. You can also glaze them with a dusting of powdered sugar or a simple vanilla icing.
Affordable
The ingredients used in this recipe are pantry staples—flour, milk, eggs, butter, sugar, and yeast. Even the jelly can be homemade or store-bought, depending on your preference and budget. You don’t need any special tools, just a rolling pin, a donut cutter or glass, and a piping bag or spoon to fill them.
Ingredients for the Recipe
-
3 cups all-purpose flour
-
1 packet (2¼ tsp) active dry yeast
-
¾ cup warm milk
-
¼ cup granulated sugar
-
2 tablespoons unsalted butter, softened
-
1 large egg
-
½ teaspoon salt
-
1 teaspoon vanilla extract
-
½ cup of jelly (strawberry or your choice)
-
Powdered sugar for dusting (optional)
-
1 tablespoon milk (for brushing before baking)
How to Prepare This Recipe
Step-by-Step Instructions for Baked Donuts Filled with Jelly
This recipe comes together beautifully with just a few simple steps. From mixing the dough to piping in that sweet jelly center, it’s a process that’s both fun and rewarding. Whether you’re baking these for a cozy breakfast or a weekend treat, the whole experience is as enjoyable as the final result.
Step 1: Activate the Yeast
Begin by warming the milk to about 110°F (just warm to the touch—not hot). In a small bowl, combine the warm milk, a teaspoon of the sugar, and the yeast. Stir gently and let it sit for 5 to 10 minutes until frothy. This means the yeast is active and ready to work.
Step 2: Make the Dough
In a large mixing bowl, whisk together the flour, remaining sugar, and salt. In a separate bowl, whisk the egg, vanilla extract, and softened butter. Pour in the activated yeast mixture and combine everything with the dry ingredients. Stir until a soft dough begins to form.
Step 3: Knead the Dough
Transfer the dough onto a lightly floured surface. Knead it for about 8 to 10 minutes until it’s smooth and elastic. If it’s too sticky, add a little more flour, one tablespoon at a time. Kneading helps develop the gluten, giving the donuts their signature softness.
Step 4: Let the Dough Rise
Place the kneaded dough into a greased bowl. Cover it with a clean kitchen towel or plastic wrap. Let it rise in a warm spot for 1 to 1½ hours, or until it doubles in size. This step is crucial for creating light, airy donuts.
Step 5: Shape the Donuts
Once the dough has risen, gently punch it down to release air. Roll it out on a lightly floured surface to about ½-inch thickness. Use a round cutter (about 3 inches in diameter) to cut out circles. Place the circles on a parchment-lined baking sheet, spaced slightly apart.
Step 6: Second Rise
Cover the shaped donuts loosely with a towel. Let them rise again for 30 to 40 minutes. They should puff up slightly. This second rise will help them bake up beautifully fluffy.
Step 7: Bake the Donuts
Preheat your oven to 350°F (175°C). Lightly brush the tops of the donuts with milk to encourage even browning. Bake in the preheated oven for 10 to 12 minutes, or until the tops are golden and the bottoms are lightly browned. Avoid overbaking to keep them soft.
Step 8: Cool and Fill
Once baked, remove the donuts from the oven and allow them to cool slightly. When they’re cool enough to handle but still slightly warm, use a piping bag fitted with a round tip (or a small knife and spoon) to fill each donut with jelly. Insert the tip into the side of each donut and gently squeeze until filled.
Step 9: Optional Topping
For a classic touch, dust the tops with powdered sugar. If you prefer a glazed donut, you can dip them in a simple icing made of powdered sugar and milk. Let the topping set before serving.
Quick and Easy
Although these donuts require some rise time, the actual preparation is simple and doesn’t require frying. With a bit of planning, you can have warm, fresh donuts from your own oven in just a few hours.
Customizable
Feel free to switch up the flavors. You can fill these with your favorite jelly, fruit compote, lemon curd, or even pastry cream. Add a cinnamon sugar coating, a light glaze, or a chocolate drizzle—whatever suits your craving.
Popular with Many People
These baked jelly donuts are always a crowd-pleaser. They’re kid-friendly, perfect for brunch tables, and great for gifting. Because they’re baked, not fried, many people feel better indulging in more than one!
Baked Donuts Filled with Jelly

These baked jelly donuts are soft, fluffy, and filled with sweet fruity jelly at the center. They’re oven-baked instead of fried, making them a lighter option that still delivers the classic donut experience. Perfect for breakfast, brunch, or a special treat, this recipe is easy to follow and completely customizable with your favorite fillings.
- Prep Time: 20
- Cook Time: 12
- Total Time: 32 minutes
- Yield: 12 1x
Ingredients
- 3 cups all-purpose flour
- 1 packet (2¼ teaspoons) active dry yeast
- ¾ cup warm milk (about 110°F)
- ¼ cup granulated sugar
- 2 tablespoons unsalted butter, softened
- 1 large egg
- ½ teaspoon salt
- 1 teaspoon vanilla extract
- ½ cup jelly (strawberry, raspberry, or flavor of choice)
- 1 tablespoon milk (for brushing before baking)
- Powdered sugar for dusting (optional)
Instructions
- Activate the yeast: In a small bowl, combine the warm milk, 1 teaspoon of sugar, and the yeast. Stir and let sit for 5–10 minutes until foamy.
- Mix the dough: In a large bowl, whisk together the flour, remaining sugar, and salt. In another bowl, beat the egg, vanilla, and softened butter. Add the yeast mixture, then pour into the dry ingredients and mix until combined.
- Knead the dough: Transfer the dough onto a lightly floured surface and knead for 8–10 minutes until smooth and elastic.
- First rise: Place the dough in a greased bowl, cover with a towel, and let it rise in a warm area for 1 to 1½ hours, or until doubled in size.
- Shape the donuts: Gently punch down the dough. Roll it out to about ½-inch thickness. Use a 3-inch round cutter to cut out circles. Place them on a baking sheet lined with parchment paper.
- Second rise: Cover the donuts loosely and let them rise for another 30–40 minutes.
- Bake: Preheat the oven to 350°F (175°C). Brush the tops of the donuts with milk. Bake for 10–12 minutes, or until golden brown.
- Cool and fill: Let the donuts cool slightly. Use a piping bag fitted with a round nozzle to fill each donut with jelly by inserting the tip into the side and gently squeezing.
- Finish: Dust with powdered sugar or glaze, if desired. Serve warm or at room temperature.
Notes
Ensure the milk is not too hot to avoid killing the yeast.
Donuts can be frozen before filling for longer storage.
Choose a thick, smooth jelly to prevent leakage.
To make these more indulgent, add a light glaze or cinnamon sugar coating.
FAQs
Can I make the dough ahead of time?
Yes, you absolutely can! After the first rise, simply cover the dough tightly and refrigerate it overnight. The next day, let it come to room temperature, then proceed with shaping, rising, and baking. This is a great option if you want to save time in the morning.
What kind of jelly works best for filling?
Any thick, smooth jelly or jam will work perfectly. I typically use strawberry or raspberry jelly because they’re classic and vibrant. Just avoid runny or chunky preserves—they might make the donuts soggy or be hard to pipe in.
How do I fill the donuts without making a mess?
The easiest method is to use a piping bag with a round nozzle. Insert the tip into the side of each donut and gently squeeze in the jelly. If you don’t have a piping bag, you can use a small knife to make a hole and a spoon to add the jelly, though it may take a bit more care.
Can I freeze these donuts?
Yes, these baked donuts freeze well—before or after filling. If freezing before filling, allow them to cool completely, then store in an airtight container. When ready to serve, thaw, reheat gently, and fill with jelly. If they’ve already been filled, freeze them without any glaze or topping to preserve texture.
Are these donuts healthier than fried ones?
Baking instead of frying significantly reduces the fat content, making these a lighter alternative. They’re still a sweet treat, but you can enjoy them with a little less guilt.
Can I use whole wheat flour or gluten-free flour?
You can substitute up to half the all-purpose flour with whole wheat flour for a denser, slightly nuttier flavor. For gluten-free versions, use a 1:1 gluten-free baking flour, but results may vary slightly in texture. Keep an eye on the moisture and dough elasticity when making adjustments.