

There’s something incredibly nostalgic about Homemade Twinkies. The very first time I tried one as a child, I was instantly captivated by the soft, golden sponge and that cloud-like vanilla filling tucked inside. Over the years, I’ve recreated many classic snacks in my kitchen, but Twinkies have always held a special place in my heart. Making them from scratch brings a sense of comfort and joy, transforming a store-bought treat into a homemade delight that feels even more satisfying. Every bite carries that sweet, creamy flavor I remember, yet now it’s even better because I know exactly what’s in it.
You will love this recipe because it perfectly balances tender sponge cake with a light, fluffy filling that melts in your mouth. These Homemade Twinkies are soft, golden, and full of pure vanilla flavor. They’re ideal for lunchboxes, snacks, or desserts after dinner. I especially love how they stay moist and delicious for days, making them perfect for planning ahead. Whether you’re baking for your family, friends, or simply indulging in a bit of personal nostalgia, this recipe guarantees smiles all around.
Another reason I enjoy this recipe is its versatility. You can easily customize it to your taste — add a hint of lemon zest to the batter for a citrus twist, or use a chocolate cream filling for a richer flavor. The sponge cake can also be turned into a fun base for other desserts, like mini strawberry shortcakes or cream-filled cupcakes. It’s a flexible recipe that adapts beautifully to your creativity.
Homemade Twinkies are also surprisingly affordable. The ingredients are simple pantry staples — flour, sugar, eggs, butter, milk, and vanilla extract. There’s no need for fancy equipment or expensive components. Even the filling uses just a few basic ingredients like marshmallow fluff, powdered sugar, and butter. For such a delightful treat, the cost is minimal, yet the result feels truly special.
Ingredients for Homemade Twinkies:
– 1 cup all-purpose flour
– 1 teaspoon baking powder
– ¼ teaspoon salt
– 4 large eggs, separated
– ¾ cup granulated sugar
– 1 teaspoon pure vanilla extract
– 2 tablespoons milk
– 4 tablespoons unsalted butter, melted and cooled
For the filling:
– ½ cup unsalted butter, softened
– 1 cup marshmallow fluff
– 1 cup powdered sugar
– 1 teaspoon vanilla extract
– 1–2 tablespoons milk (as needed for consistency)
How to Prepare Homemade Twinkies
When I make Homemade Twinkies, I always start by organizing my workspace. Having every ingredient ready makes the process quick, easy, and enjoyable. This recipe doesn’t require any special baking skills — just a little patience and attention to detail. The steps are simple, and the results are incredibly rewarding.
Step 1: Prepare the baking molds
To create that classic Twinkie shape, you can use a special Twinkie pan or improvise with a standard muffin pan lined with folded pieces of foil to form small boat-shaped molds. Grease the molds lightly with butter or nonstick spray, and set them aside. Then, preheat your oven to 350°F (175°C) to ensure it’s ready when your batter is done.
Step 2: Separate and beat the eggs
Separate the egg yolks from the whites into two different bowls. In a clean mixing bowl, beat the egg whites until soft peaks form. Gradually add half of the sugar (about ⅜ cup) while continuing to beat until glossy and firm peaks develop. The egg whites give the sponge its signature light texture, so be careful not to overmix them.
Step 3: Mix the yolk mixture
In another bowl, whisk the egg yolks with the remaining sugar until the mixture turns pale and creamy. Add the vanilla extract, melted butter, and milk, and continue whisking until everything is well combined. The batter should look smooth and slightly thick.
Step 4: Combine the mixtures
Sift together the flour, baking powder, and salt. Gently fold these dry ingredients into the yolk mixture until just combined. Then, carefully fold in the whipped egg whites using a spatula. This step requires a gentle hand to maintain the airy texture of the batter. The result should be a light, fluffy mixture that’s easy to pour.
Step 5: Fill the molds
Spoon or pipe the batter into each prepared mold, filling them about two-thirds full. This allows room for the cakes to rise without overflowing. Smooth the tops lightly with the back of a spoon for an even shape.
Step 6: Bake the cakes
Place the molds on the center rack of your preheated oven and bake for 12–15 minutes, or until the cakes are golden and spring back when lightly pressed. To check for doneness, insert a toothpick into the center — it should come out clean. Once baked, remove them from the oven and let them cool in the molds for about five minutes. Then, transfer the Twinkies to a wire rack to cool completely.
Step 7: Prepare the filling
While the cakes cool, make the creamy filling. In a large bowl, beat the softened butter until smooth and fluffy. Add the marshmallow fluff and powdered sugar, then mix on medium speed until well blended. Add the vanilla extract, and if needed, a tablespoon or two of milk to reach a soft, pipeable consistency. The filling should be smooth, creamy, and light.
Step 8: Fill the Twinkies
Once the sponge cakes are completely cool, use a small skewer or the handle of a spoon to poke three holes along the bottom of each Twinkie. Fit a piping bag with a small round tip, fill it with the cream, and gently pipe the filling into each hole until you feel resistance. This ensures every bite contains that signature fluffy cream center.
Step 9: Serve and store
Your Homemade Twinkies are now ready to enjoy! I like to serve them slightly chilled, as the filling firms up just enough to give a perfect contrast to the soft sponge. Store them in an airtight container at room temperature for up to two days, or refrigerate for longer freshness.
Why this recipe works so well
This recipe is quick and easy, yet it delivers professional-quality results. The light sponge rises beautifully without any complicated techniques, and the marshmallow filling adds just the right amount of sweetness. Because everything is made from scratch, the flavor is fresher, and the texture is softer than anything store-bought.
You can also customize this recipe easily. If you prefer chocolate Twinkies, replace two tablespoons of flour with cocoa powder. For a fruity variation, fill them with strawberry or lemon cream instead of vanilla. They’re also fun to dip halfway in melted chocolate for a party treat. These little cakes are always a crowd-pleaser and work beautifully for birthdays, picnics, or as a nostalgic dessert.
Homemade Twinkies have become one of my favorite recipes to bake when I want something simple yet impressive. The process feels relaxing, and the reward is a batch of golden, cream-filled cakes that make everyone happy. Each bite brings back childhood memories, yet with a freshness and flavor only homemade baking can offer.
PrintBack-to-School Homemade Twinkies Fun & Nostalgic Treats
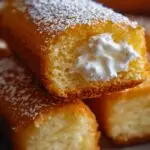
These Homemade Twinkies are soft, golden sponge cakes filled with a light and creamy vanilla filling. Made entirely from scratch, they capture the nostalgic flavor of the classic treat while remaining simple, affordable, and customizable. Perfect for snacks, parties, or desserts, they’re a delightful way to bring a homemade touch to a beloved favorite.
- Prep Time: 25
- Cook Time: 15
- Total Time: 40 minutes
- Yield: 12 1x
Ingredients
For the sponge cakes:
- 1 cup all-purpose flour
- 1 teaspoon baking powder
- ¼ teaspoon salt
- 4 large eggs, separated
- ¾ cup granulated sugar
- 1 teaspoon pure vanilla extract
- 2 tablespoons milk
- 4 tablespoons unsalted butter, melted and cooled
For the filling:
- ½ cup unsalted butter, softened
- 1 cup marshmallow fluff
- 1 cup powdered sugar
- 1 teaspoon vanilla extract
- 1–2 tablespoons milk (as needed for texture)
Instructions
- Preheat oven to 350°F (175°C). Lightly grease Twinkie molds or line a muffin pan with foil molds.
- Separate the eggs. Beat the egg whites until soft peaks form, then slowly add half the sugar and continue beating until glossy peaks develop.
- In another bowl, whisk egg yolks with the remaining sugar until pale and creamy. Mix in vanilla extract, melted butter, and milk until smooth.
- Sift flour, baking powder, and salt together. Gently fold dry ingredients into the yolk mixture.
- Carefully fold in whipped egg whites using a spatula until fully combined.
- Fill molds about two-thirds full. Smooth tops with a spoon.
- Bake for 12–15 minutes or until golden and springy to the touch.
- Cool in the molds for five minutes, then transfer to a wire rack to cool completely.
- Prepare the filling by beating butter until fluffy. Add marshmallow fluff and powdered sugar, then mix until smooth. Blend in vanilla extract and a little milk if needed.
- Poke three holes along the bottom of each cooled cake using a skewer or small utensil handle.
- Pipe the cream filling into each hole until filled.
- Serve immediately or store in an airtight container.
Notes
For a chocolate variation, replace two tablespoons of flour with cocoa powder.
Chill filled Twinkies for a firmer texture.
Ensure the cakes are fully cooled before filling to prevent melting the cream.
FAQs
1. Can I make Homemade Twinkies without a special pan?
Yes, absolutely. If you don’t have a Twinkie mold, you can easily make your own by shaping pieces of aluminum foil into small boat-like cups and placing them inside a muffin tin for support. This method works just as well and gives the same signature shape.
2. How do I keep the Twinkies soft and fresh?
To maintain their moist texture, store the cooled Twinkies in an airtight container. You can keep them at room temperature for up to two days, but for longer freshness, refrigerate them. Before serving, allow them to come to room temperature for the best texture.
3. Can I freeze Homemade Twinkies?
Yes, they freeze beautifully. Wrap each one tightly in plastic wrap and store them in a freezer bag for up to two months. When you’re ready to enjoy, thaw them in the refrigerator overnight or at room temperature for a few hours.
4. Can I make them gluten-free or dairy-free?
Definitely. Use a gluten-free all-purpose flour blend for a gluten-free version, and replace butter and milk with dairy-free alternatives such as coconut oil and almond milk. The taste remains just as delicious and soft.