
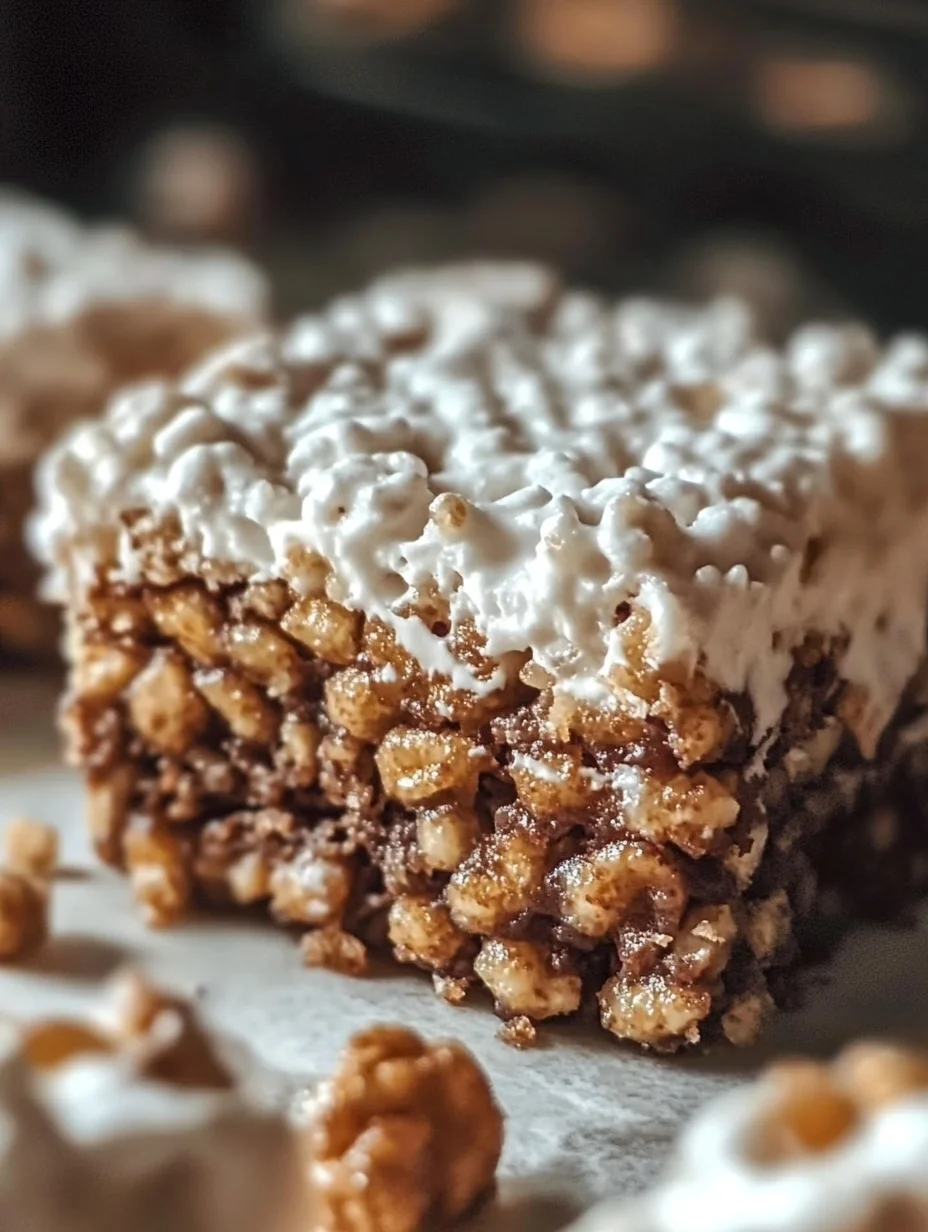
When I first made these Muddy Buddy Rice Krispies, it was purely out of curiosity. I had always loved the classic Muddy Buddies—those crunchy chocolate and peanut butter–coated snacks dusted in powdered sugar—but one day, I wondered how that same magic would taste when combined with crispy Rice Krispies. The result completely exceeded my expectations. The light, airy crunch of the cereal blends perfectly with the creamy coating, creating a snack that’s both nostalgic and wonderfully addictive. Every bite feels like a delicious combination of sweetness and texture, and it’s one of those recipes that quickly became a family favorite in my kitchen.
You’ll love this recipe because it’s quick, easy, and irresistibly delicious. There’s no baking involved, which makes it perfect for busy days or when you need a last-minute treat. The ingredients are pantry staples—things you probably already have on hand. The mix of chocolate, peanut butter, and a dusting of powdered sugar creates that classic Muddy Buddy flavor, but the Rice Krispies add a lighter twist that makes every handful disappear faster than you’d expect. It’s also an excellent recipe to make with kids—they can help stir, coat, and shake the mix until it’s perfectly covered.
What makes this recipe even better is its versatility. You can easily adapt it to suit your taste. Want extra crunch? Add pretzels or roasted peanuts. Prefer a little saltiness to balance the sweetness? A pinch of sea salt does the trick. Looking for something festive? Add colorful sprinkles or mini chocolate candies. It’s a simple base recipe that you can modify for any occasion—holidays, school snacks, or movie nights.
Another great thing about Muddy Buddy Rice Krispies is how affordable it is. You don’t need fancy ingredients or special equipment to make it. Everything comes together in just a few minutes using basic pantry items. The ingredients stretch far, so it’s ideal for parties or for gifting during the holidays. And since it stays fresh for days in an airtight container, you can make it ahead of time and still enjoy that perfect crunchy texture later.
Here are the main ingredients you’ll need for this recipe:
-
Rice Krispies cereal
-
Semi-sweet chocolate chips
-
Creamy peanut butter
-
Butter
-
Vanilla extract
-
Powdered sugar
How to Prepare Muddy Buddy Rice Krispies
Making Muddy Buddy Rice Krispies is a quick and enjoyable process that requires no baking, minimal cleanup, and delivers a deliciously addictive snack. Every time I prepare it, I’m reminded how simple ingredients can create something so satisfying. The combination of chocolate, peanut butter, and the light crunch of Rice Krispies makes this recipe truly irresistible. Let’s go through the step-by-step preparation so you can make this treat perfectly every time.
How to Prepare This Recipe
Start by gathering all your ingredients and setting up your workspace. You’ll need a large mixing bowl, a medium saucepan or microwave-safe bowl, and a large resealable plastic bag or airtight container for coating the cereal with powdered sugar. Preparation is straightforward, but it’s best to have everything ready since the melted mixture can cool and thicken quickly.
Step-by-Step Instructions for Preparation
Step 1: Measure the cereal
Pour about six cups of Rice Krispies cereal into a large mixing bowl. Set it aside while you prepare the chocolate and peanut butter mixture. Make sure the bowl is large enough to easily toss and coat the cereal evenly.
Step 2: Melt the chocolate mixture
In a medium saucepan over low heat, add one cup of semi-sweet chocolate chips, half a cup of creamy peanut butter, and a quarter cup of butter. Stir continuously as the ingredients melt together, making sure the mixture doesn’t burn. Once everything is smooth and fully melted, remove it from the heat and stir in one teaspoon of vanilla extract.
If you prefer using the microwave, combine the chocolate, peanut butter, and butter in a microwave-safe bowl. Heat in 30-second intervals, stirring after each one, until the mixture becomes completely smooth and glossy. Then, mix in the vanilla extract.
Step 3: Combine with the cereal
Pour the warm chocolate mixture over the Rice Krispies cereal in the large bowl. Use a spatula or large spoon to gently fold the mixture until all the cereal is well coated. Take your time to ensure each piece gets an even layer of chocolate and peanut butter without crushing the delicate Rice Krispies.
Step 4: Coat with powdered sugar
Allow the coated cereal to cool for about 3 to 4 minutes—just enough so it’s not too hot to handle but still tacky. Add the mixture to a large resealable plastic bag or airtight container. Add about one and a half cups of powdered sugar, seal the bag tightly, and shake until every piece is completely coated in sugar. This step gives the snack its signature powdery finish and prevents the pieces from sticking together.
Step 5: Let it set
Spread the coated cereal mixture onto a baking sheet lined with parchment paper. Let it sit for at least 15 minutes to cool completely and firm up. Once it’s cooled, break apart any large clumps with your hands for an even texture.
Quick and Easy Snack
This recipe takes less than 20 minutes from start to finish, making it one of the quickest homemade treats you can prepare. There’s no baking involved, so it’s perfect when you want something sweet but don’t want to turn on the oven. The cleanup is simple, too—just one saucepan and a mixing bowl.
Customizable and Fun to Make
What I love most about this recipe is how easily it can be customized. You can switch up the ingredients depending on your mood or what’s in your pantry. If you want an extra crunch, mix in pretzel pieces, cornflakes, or chopped roasted peanuts. For a touch of color, add mini chocolate candies or drizzle white chocolate over the finished mix. If you prefer a slightly less sweet version, reduce the powdered sugar a bit or use dark chocolate instead of semi-sweet.
This recipe also works beautifully for themed occasions. During holidays, you can mix in colored sprinkles—red and green for Christmas, pastel tones for Easter, or orange and black for Halloween. It’s such a simple recipe that transforms easily with small touches.
Popular with Everyone
Every time I make Muddy Buddy Rice Krispies, they disappear almost instantly. They’re popular with kids and adults alike, making them perfect for school snacks, party tables, or casual get-togethers. The combination of light crispiness, smooth chocolate, and that sweet powdery coating is hard to resist. You can serve them in small bowls, pack them into gift bags, or store them in jars for an easy grab-and-go treat.
The best part is how well they keep. Store them in an airtight container at room temperature for up to five days. The cereal remains crisp, and the flavor stays rich and satisfying. If you like a firmer texture, you can even refrigerate them for a short time before serving.
This recipe truly proves that great snacks don’t have to be complicated. It’s quick, easy, and endlessly adaptable—a perfect blend of fun, flavor, and crunch that always delights everyone who tries it.
PrintEasy Muddy Buddy Rice Krispies – A Sweet No-Bake Snack
These Muddy Buddy Rice Krispies combine the nostalgic flavors of chocolate and peanut butter with the irresistible crunch of Rice Krispies cereal. Coated in a light dusting of powdered sugar, this no-bake snack is quick, simple, and perfect for parties, holidays, or any time you crave something sweet and crunchy.
- Prep Time: 5
- Cook Time: 10
- Total Time: 15 minutes
- Yield: 8 1x
Ingredients
- 6 cups Rice Krispies cereal
- 1 cup semi-sweet chocolate chips
- ½ cup creamy peanut butter
- ¼ cup butter
- 1 teaspoon vanilla extract
- 1½ cups powdered sugar
Instructions
- Measure 6 cups of Rice Krispies cereal and place them in a large mixing bowl. Set aside.
- In a medium saucepan, combine 1 cup of semi-sweet chocolate chips, ½ cup of creamy peanut butter, and ¼ cup of butter.
- Melt the mixture over low heat, stirring constantly until smooth and well combined.
- Remove from the heat and stir in 1 teaspoon of vanilla extract.
- Pour the warm chocolate mixture over the Rice Krispies cereal.
- Gently fold the mixture with a spatula until every piece is coated evenly.
- Allow the coated cereal to cool slightly for 3–4 minutes.
- Transfer the mixture into a large resealable plastic bag or container.
- Add 1½ cups of powdered sugar to the bag, seal tightly, and shake until all cereal pieces are evenly coated.
- Spread the coated mixture on a baking sheet lined with parchment paper and let it cool completely for about 15 minutes.
- Once cooled, break apart any large clumps and store in an airtight container.
Notes
You can add mini chocolate candies, pretzel pieces, or chopped nuts for extra texture.
For a festive touch, sprinkle colored candies or drizzle with white chocolate.
Always ensure the mixture is slightly cooled before adding powdered sugar to prevent clumping.
Keep stored snacks in a dry, airtight container to maintain their crispness.
FAQs
1. Can I use another type of cereal instead of Rice Krispies?
Yes, you can. While Rice Krispies give a light and crispy texture, you can substitute them with other puffed cereals such as cornflakes or Chex. Each cereal offers a slightly different crunch, so feel free to experiment.
2. Can I make this recipe without peanut butter?
Absolutely. If you’re allergic to peanuts or prefer not to use them, replace the peanut butter with almond butter, sunflower seed butter, or even cookie butter. The flavor will still be rich and creamy.
3. How do I store Muddy Buddy Rice Krispies?
Store them in an airtight container at room temperature for up to five days. If your kitchen is warm, keep them in the refrigerator to maintain their crispiness. Avoid exposure to moisture, as it can make the cereal soggy.
4. Can I make them ahead of time?
Yes. This recipe is great for preparing in advance. Make a batch a day or two before serving, and keep it sealed tightly. The flavor actually improves slightly after resting for a few hours.
5. How can I make this snack less sweet?
You can reduce the powdered sugar slightly or use dark chocolate chips instead of semi-sweet for a richer, less sugary taste.