

A Short Story About the Recipe
The first time I made bao buns, I remember being completely fascinated by their soft, cloud-like texture. I had tasted them many times before in local Asian restaurants, always served warm and filled with tender meat or crisp vegetables, but I never imagined how satisfying it would be to create them in my own kitchen. The gentle steam rising from the bamboo basket, the subtle aroma of flour and yeast — it felt like magic unfolding before my eyes. Over time, I learned to simplify the process, keeping all the authenticity of traditional bao but with quicker steps for busy days. That’s how this Quick and Easy Bao Buns recipe came to life — soft, fluffy, and irresistibly comforting.
Why You Will Love This Recipe
You will fall in love with these bao buns because they are light, pillowy, and incredibly versatile. Whether you fill them with savory chicken, crisp vegetables, or spicy beef, every bite feels like comfort and creativity combined. They’re simple to make, even for those who have never worked with yeast before, and they always bring joy to the table. These buns are not just food — they are an experience of texture and taste that reminds you how rewarding homemade cooking can be.
Versatile
These bao buns can adapt beautifully to almost any flavor combination. You can serve them as appetizers, snacks, or even as part of a main dish. I often fill mine with shredded chicken and a drizzle of hoisin sauce, but they’re just as good with grilled tofu or stir-fried vegetables. You can even make them sweet by adding a touch of honey and stuffing them with fruit or sweet red bean paste. Their soft texture and neutral taste make them a blank canvas for endless creativity.
Affordable
Making bao buns at home is far more affordable than buying them pre-made or ordering from restaurants. The ingredients are basic — just flour, yeast, sugar, and a few pantry staples. You can prepare a batch for a fraction of the cost, and the result tastes fresher and more personal. Plus, you can freeze extra buns for later, saving both time and money.
Ingredients for Quick and Easy Bao Buns
-
2 cups all-purpose flour
-
2 tablespoons sugar
-
1 teaspoon instant yeast
-
½ teaspoon baking powder
-
½ teaspoon salt
-
¾ cup warm milk (or water)
-
2 tablespoons vegetable oil
How to Prepare This Recipe
Step-by-Step Instructions for Preparation
Making bao buns might look complex at first, but once you understand the rhythm of the dough and the steaming process, it becomes second nature. Here’s how I prepare my Quick and Easy Bao Buns, step by step.
Step 1: Prepare the Dough
I begin by combining the warm milk, sugar, and yeast in a small bowl. I let it sit for about 10 minutes, just until it turns slightly frothy on the surface. This step helps activate the yeast and ensures the buns rise beautifully later. In another large mixing bowl, I whisk together the flour, baking powder, and salt. Once the yeast mixture is ready, I pour it into the dry ingredients along with the vegetable oil. Using a wooden spoon or my hands, I mix until the dough starts to come together.
Step 2: Knead Until Smooth
I transfer the dough onto a lightly floured surface and knead it for about 8 to 10 minutes, or until it becomes soft, elastic, and slightly springy to the touch. The goal is to develop the gluten without making the dough too stiff. If it feels sticky, I sprinkle just a little more flour. The dough should feel smooth and pliable, not dry.
Step 3: First Rise
Once kneaded, I place the dough in a greased bowl, cover it with a damp cloth, and let it rest in a warm place for about one hour. During this time, the dough will double in size. I always find this step fascinating — the gentle transformation reminds me that even simple ingredients can create something wonderful when given time to grow.
Step 4: Shape the Bao Buns
After the dough has risen, I punch it down gently to release the air, then roll it out on a floured surface to about ¼ inch thickness. Using a round cutter (or a drinking glass), I cut out small circles. I lightly brush one side of each circle with oil to prevent sticking, then fold it in half to form the classic half-moon shape. I place each folded bun on a small square of parchment paper to keep them from sticking together during steaming.
Step 5: Second Rise
I arrange the shaped buns on a tray, cover them again with a damp cloth, and allow them to rise for another 30 minutes. This second rise gives the buns their characteristic lightness and helps them expand perfectly once steamed.
Step 6: Steam the Buns
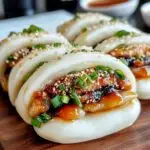
To steam, I set up my bamboo steamer (a metal steamer works fine too) over a pot of boiling water. I line the steamer with parchment paper and place the buns inside, leaving space between each one to allow for expansion. I steam them for about 10 minutes over medium-high heat. When they’re done, the buns should be soft, fluffy, and slightly glossy on top. I always lift the lid carefully to avoid condensation dripping onto the buns.
Quick and Easy
These bao buns are surprisingly quick compared to traditional versions, thanks to the simple dough and fast-rising method. From start to finish, they can be ready in under two hours. Once you’ve mastered the process, you’ll find yourself making them even on busy evenings or spontaneous weekends when you crave something warm and comforting.
Customizable
What I love most about this recipe is its flexibility. You can fill these buns with whatever you have at home — shredded chicken, spicy beef, sautéed mushrooms, or even crispy tofu. I often prepare a simple filling of stir-fried vegetables tossed with soy sauce, sesame oil, and garlic. For a heartier version, I use tender chicken glazed with hoisin or teriyaki sauce. You can also brush the buns with a bit of oil before steaming if you prefer a shinier texture.
For those who enjoy sweet flavors, this same dough can transform into dessert buns. Simply add a little extra sugar to the dough and fill them with sweet red bean paste, custard, or fruit preserves. The texture remains soft and fluffy, making them perfect for a light treat.
Popular with Many People
Bao buns have become one of my most requested recipes among friends and family. Everyone seems to love their soft texture and the way they hold different fillings so beautifully. They’re especially popular during gatherings or special occasions because they look impressive but are surprisingly easy to make. I often serve them as part of a build-your-own-bao dinner, where everyone chooses their favorite fillings and toppings — it always becomes a fun and interactive meal.
These buns also freeze exceptionally well. Once cooled, I store them in an airtight container and freeze for up to a month. When I need them, I re-steam for a few minutes, and they turn out just as soft as freshly made. That’s why I always make a double batch — they disappear faster than I expect.
PrintQuick and Easy Bao Buns for Every Meal
These Quick and Easy Bao Buns are soft, fluffy, and wonderfully light. Made with simple pantry ingredients, they deliver authentic texture and flavor without the long wait. Whether filled with chicken, beef, tofu, or vegetables, these buns bring warm comfort and delicious simplicity to every meal.
- Prep Time: 1 hour 20 minutes
- Cook Time: 10
- Total Time: 1 hour 30 minutes
- Yield: 12 1x
Ingredients
- 2 cups all-purpose flour
- 2 tablespoons sugar
- 1 teaspoon instant yeast
- ½ teaspoon baking powder
- ½ teaspoon salt
- ¾ cup warm milk (or warm water)
- 2 tablespoons vegetable oil
Instructions
- Activate the Yeast:
In a small bowl, combine the warm milk, sugar, and yeast. Stir gently and let the mixture sit for about 10 minutes until slightly frothy on top. This ensures the yeast is active and ready. - Mix the Dry Ingredients:
In a large mixing bowl, whisk together the flour, baking powder, and salt. Make a small well in the center to pour in the liquid later. - Combine Wet and Dry Ingredients:
Pour the yeast mixture into the flour mixture, then add the vegetable oil. Using a wooden spoon or your hands, mix until a rough dough begins to form. The dough should start to come together without sticking excessively to your hands. - Knead the Dough:
Transfer the dough onto a clean, lightly floured surface. Knead for about 8–10 minutes until it becomes smooth, elastic, and soft. If it feels too sticky, sprinkle a little more flour, but keep the dough moist enough to stretch easily. - First Rise:
Lightly grease a clean bowl and place the dough inside. Cover it with a damp cloth and let it rest in a warm place for about 1 hour, or until the dough has doubled in size. - Shape the Buns:
Once the dough has risen, gently punch it down to release trapped air. Roll it out on a floured surface to about ¼ inch thickness. Use a round cutter (or glass) to cut circles from the dough. Brush one side of each circle lightly with oil, then fold it in half to form the signature bao shape. Place each folded piece on a small square of parchment paper. - Second Rise:
Arrange the buns on a tray, cover with a damp cloth, and let them rest again for 30 minutes. This second rise ensures they remain airy and soft. - Steam the Buns:
Prepare a steamer by bringing water to a steady boil. Line the steamer with parchment paper to prevent sticking. Place the buns inside, leaving enough space between each one. Steam over medium-high heat for 10 minutes. When finished, lift the lid carefully to avoid condensation dripping onto the buns. - Serve Warm:
Once steamed, the bao buns should look light, fluffy, and slightly glossy. Serve them warm, filled with your choice of ingredients such as shredded chicken, beef, or vegetables.
Notes
Always use warm (not hot) liquid to activate the yeast — too much heat can kill it.
For a shinier surface, lightly brush the buns with oil before steaming.
Leftover buns can be stored in an airtight container and re-steamed for 3–5 minutes before serving.
If desired, the dough can rest overnight in the refrigerator for deeper flavor.
FAQs
Can I make bao buns without a bamboo steamer?
Yes, you can. If you don’t have a bamboo steamer, use a regular metal steamer or even a large pot with a steaming rack. Just make sure to line it with parchment paper to prevent sticking. The texture will still turn out soft and fluffy.
Can I prepare the dough ahead of time?
Absolutely. I often make the dough a few hours in advance and let it rest in the refrigerator. Before shaping, I allow it to come back to room temperature so it’s easier to work with. This method helps when planning meals or saving time before guests arrive.
Can I freeze bao buns?
Yes, these buns freeze beautifully. Once steamed and cooled, I store them in airtight containers or freezer bags. When ready to serve, I re-steam them for 5–7 minutes until soft and warm again.
Why did my buns turn out dense?
If your buns feel heavy, the dough may not have risen long enough or the yeast was inactive. Always ensure your yeast is fresh and give the dough enough time to rest and double in size.
Can I bake bao buns instead of steaming?
You can, but baking will give them a firmer texture rather than the classic soft and fluffy result that steaming creates.