
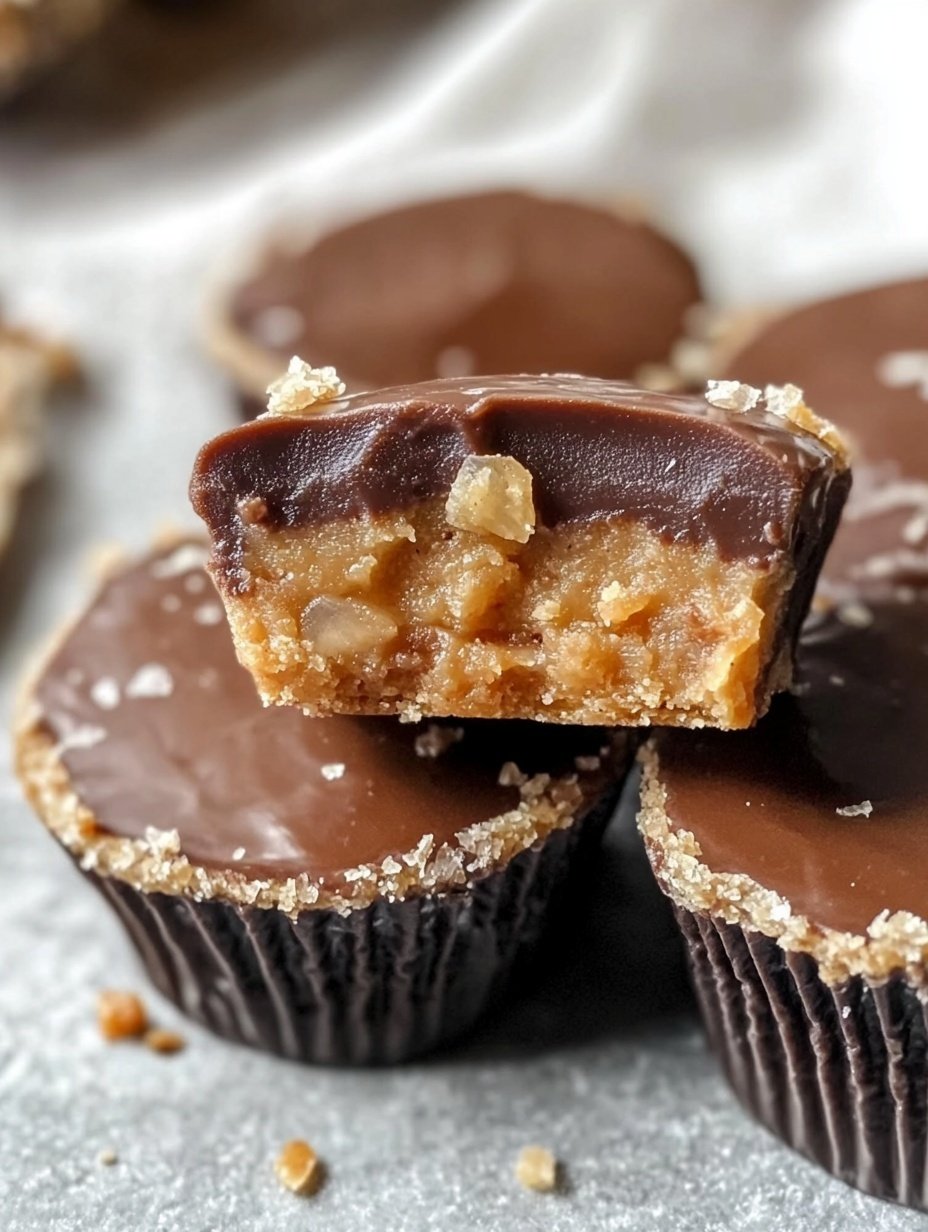
I have always loved the indulgent taste of a TWIX bar, but as a baker who is conscious about health and nutrition, I wanted to create a version that satisfies cravings without compromising wellness. That’s how these Healthy, No Bake TWIX Cups came to life. From the very first bite, they deliver the perfect combination of crunchy, chewy, and sweet, all wrapped in a guilt-free treat that’s easy to make at home.
You will love this recipe because it combines rich flavors with simple ingredients, making it a delightful snack for both kids and adults. Unlike traditional desserts that require hours in the oven, these cups are ready in no time. They are naturally sweetened, full of wholesome ingredients, and have a satisfyingly crunchy base topped with a smooth caramel layer and a chocolate coating that tastes just like the original TWIX.
The versatility of these cups is impressive. You can enjoy them as a quick breakfast snack, a post-workout treat, or even as a homemade gift for friends and family. The recipe allows room for creativity—you can swap ingredients, add nuts, or drizzle extra chocolate to suit your taste. Their portioned size also makes them perfect for lunchboxes or a convenient snack on the go.
Another great advantage is affordability. The ingredients are pantry staples and easy to find at any local store. You don’t need fancy equipment or specialty items to make these delicious treats. Plus, with no baking involved, you save on electricity and reduce kitchen cleanup, making it an efficient choice for busy days.
Ingredients for Healthy, No Bake TWIX Cups:
-
1 cup rolled oats
-
1/2 cup almond flour
-
1/4 cup coconut oil, melted
-
1/4 cup maple syrup or honey
-
1/2 teaspoon vanilla extract
-
1/4 teaspoon salt
-
1/2 cup medjool dates, pitted and chopped
-
1/4 cup almond butter or peanut butter
-
1/4 cup chopped nuts (optional)
-
1/2 cup dark chocolate chips or healthy chocolate chunks
These ingredients come together effortlessly to form a snack that is both satisfying and nourishing, proving that indulgence can indeed be healthy.
How to Prepare Healthy, No Bake TWIX Cups
Making these Healthy, No Bake TWIX Cups is surprisingly simple and quick. With minimal effort, you can transform wholesome ingredients into a dessert that tastes decadent. This step-by-step guide will walk you through each stage to ensure perfect results every time.
Step-by-Step Instructions for Preparation
-
Prepare the Base: Start by combining 1 cup of rolled oats, 1/2 cup almond flour, 1/4 teaspoon salt, 1/4 cup melted coconut oil, and 1/4 cup maple syrup or honey in a medium mixing bowl. Use a spatula to mix until a sticky, uniform dough forms.
-
Press the Base: Line a muffin tin with paper liners. Divide the dough evenly among the cups, pressing it firmly into the bottom of each liner. Make sure the base is compact so it holds together when you add the next layers.
-
Make the Caramel Layer: In a small food processor, combine 1/2 cup chopped medjool dates, 1/4 cup almond butter, and 1/2 teaspoon vanilla extract. Blend until smooth, forming a thick, sticky caramel.
-
Add the Caramel: Spoon the caramel mixture over each prepared base, spreading it evenly. You can use the back of a spoon or your fingers to smooth the layer, making sure it covers the base completely.
-
Optional Nuts: Sprinkle chopped nuts on top of the caramel layer for added crunch and flavor. Press lightly so they stick without sinking.
-
Prepare the Chocolate Layer: Melt 1/2 cup dark chocolate chips or healthy chocolate chunks in a double boiler or microwave. If using a microwave, heat in 30-second intervals, stirring in between to prevent burning.
-
Top with Chocolate: Pour or spoon the melted chocolate over the caramel layer in each cup. Use a small spatula or the back of a spoon to spread it evenly, covering the caramel completely.
-
Chill: Place the muffin tin in the refrigerator for at least 1 hour to allow the layers to set. The cups should be firm to the touch and easy to remove from the liners.
-
Serve: Once set, gently peel away the liners and enjoy. Store leftovers in an airtight container in the fridge for up to a week, or freeze for longer storage.
Quick and Easy Tips
-
To save time, you can pre-chop dates or use a pre-made date paste.
-
Use silicone muffin molds to skip liners and make removal even easier.
Customizable Ideas
-
Add a pinch of sea salt on top of the chocolate layer for a salted caramel twist.
-
Swap almond butter with peanut butter or cashew butter for different flavors.
-
Mix in shredded coconut or mini chocolate chips in the base for added texture.
Popular with Everyone
These cups are a crowd-pleaser, perfect for parties, after-school snacks, or a healthy dessert alternative. Their balance of chewy, sweet, and crunchy textures makes them irresistible to both kids and adults alike. With every bite, you get the satisfaction of a TWIX bar without the excess sugar or processed ingredients.
PrintHealthy Twix Cups
These Healthy, No Bake TWIX Cups are a guilt-free twist on the classic candy bar. They combine a crunchy oat-almond base, a sweet date and almond butter caramel, and a smooth chocolate topping. Perfect for snacks, desserts, or lunchbox treats, they are quick to prepare, versatile, and loved by everyone.
- Prep Time: 20
- Total Time: 20 minutes
- Yield: 12 1x
Ingredients
Base:
- 1 cup rolled oats
- 1/2 cup almond flour
- 1/4 teaspoon salt
- 1/4 cup melted coconut oil
- 1/4 cup maple syrup or honey
Caramel Layer:
- 1/2 cup medjool dates, pitted and chopped
- 1/4 cup almond butter or peanut butter
- 1/2 teaspoon vanilla extract
- Optional: 1/4 cup chopped nuts
- Chocolate Layer: 1/2 cup dark chocolate chips or healthy chocolate chunks
Instructions
- Combine base ingredients (rolled oats, almond flour, salt, melted coconut oil, maple syrup) in a medium bowl. Mix until sticky and uniform.
- Line a muffin tin with paper liners and press the base mixture firmly into each cup. Ensure the base is compact.
- Blend caramel layer ingredients (dates, almond butter, vanilla extract) in a food processor until smooth and sticky.
- Spread caramel evenly over the base in each cup. Press lightly to ensure even coverage.
- Optional: Sprinkle chopped nuts on top of the caramel layer and press gently.
- Melt chocolate chips using a double boiler or microwave (30-second intervals, stirring each time).
- Pour chocolate over the caramel layer in each cup, spreading evenly to cover the caramel completely.
- Chill in the refrigerator for at least 1 hour, until firm.
- Serve by gently removing paper liners. Store in an airtight container in the fridge for up to 1 week or freeze for longer storage.
Notes
Use silicone muffin molds for easy removal instead of paper liners.
Customize with shredded coconut, mini chocolate chips, or a sprinkle of sea salt.
Adjust nut butter or sweeteners based on taste preferences.
FAQs – Healthy, No Bake TWIX Cups
1. Can I make these TWIX cups gluten-free?
Yes, they are naturally gluten-free if you use certified gluten-free oats and almond flour. This makes them suitable for those with gluten sensitivities.
2. Can I use other nut butters instead of almond butter?
Absolutely. Peanut butter, cashew butter, or sunflower seed butter can all be used. Each will slightly change the flavor but still work beautifully.
3. How long can I store them?
Store the cups in an airtight container in the refrigerator for up to one week. For longer storage, freeze them for up to three months.
4. Can I make them vegan?
Yes. Ensure you use maple syrup or agave instead of honey, and choose vegan chocolate chips. All other ingredients are plant-based.
5. Do I need a food processor?
While a food processor makes blending the caramel easier, you can also finely chop the dates and mix with a spoon or fork to achieve a sticky consistency.
6. Can I make them ahead of time for a party?
Yes. These cups hold up well when refrigerated and can be prepared a day or two in advance. If freezing, remove them from the freezer about 10–15 minutes before serving for the best texture.