
Whenever I bake this Reese’s Chocolate Peanut Butter Earthquake Cake, I feel like I’m creating a dessert that never fails to surprise and impress. I first made it on a cozy weekend when I wanted something more than just an ordinary chocolate cake. The moment I took it out of the oven, I noticed the way the peanut butter swirls, the melted chocolate, and the gooey layers had shifted and cracked, giving it that iconic “earthquake” appearance. It was messy, indulgent, and absolutely irresistible. Since then, this cake has become one of my favorite showstopper recipes for birthdays, gatherings, or just when I want to treat myself and my family.
What makes this recipe so special is not just its appearance but the flavor combination that everyone loves. Peanut butter and chocolate are classics, but when you add cream cheese filling, crushed Reese’s candies, and a fudgy chocolate base, it transforms into a dessert that tastes like a bakery masterpiece straight from your oven. It’s rich, comforting, and guaranteed to please anyone who tries a slice.
Why You Will Love This Recipe
You’ll love this recipe because it combines ease with indulgence. You don’t need complicated skills or expensive tools to achieve a cake that looks and tastes incredible. The texture is unlike any other cake: soft, fudgy, creamy, and filled with chunks of peanut butter cups. The “earthquake” effect makes each slice look different, and no two pieces are ever the same, which adds to its charm. If you’re searching for a dessert that feels festive yet simple enough for a weeknight treat, this cake fits perfectly.
Versatile
This cake is extremely versatile. You can serve it warm with a scoop of vanilla ice cream for a decadent dessert or enjoy it cooled down with a glass of milk or a hot cup of coffee. It works beautifully as a birthday cake, a potluck contribution, or even a holiday dessert centerpiece. If you want to adjust the sweetness, you can balance it by using dark chocolate cake mix or adding a little sea salt on top for contrast.
Affordable
Another reason I love baking this cake is its affordability. All the ingredients are easy to find at any grocery store, and most of them are pantry staples. Cake mix, cream cheese, peanut butter, and candy bars aren’t expensive, yet when combined, they create a dessert that tastes like it came from a gourmet bakery. You don’t need to spend a fortune to make something truly indulgent.
Ingredients for the Recipe
-
1 box chocolate cake mix (plus ingredients listed on the package: eggs, oil, water)
-
8 oz cream cheese, softened
-
½ cup unsalted butter, softened
-
4 cups powdered sugar
-
½ cup creamy peanut butter
-
1 ½ cups chopped Reese’s peanut butter cups
-
1 cup semi-sweet chocolate chips
How to Prepare This Recipe
When I prepare this Reese’s Chocolate Peanut Butter Earthquake Cake, I always remind myself that it looks more complicated than it really is. The truth is, this recipe is straightforward and doesn’t require advanced baking skills. The beauty of it lies in layering and letting the oven do the magic. The “earthquake” effect happens naturally as the batter and the creamy peanut butter filling bake together, so even if it looks rustic, that’s exactly the way it should be.
Step-by-Step Instructions for Preparation
Step 1: Prepare the Cake Mix
Start by preheating your oven to 350°F (175°C). Grease a 9×13-inch baking dish generously with butter or nonstick spray. In a large bowl, prepare the chocolate cake mix according to the directions on the package, usually by combining eggs, oil, and water with the mix. Stir until the batter is smooth and glossy. Pour this mixture into the greased baking dish, spreading it evenly. This will form the base of your earthquake cake.
Step 2: Make the Cream Cheese Filling
In another large mixing bowl, beat together the softened cream cheese and softened butter until smooth and creamy. Add the peanut butter and continue mixing until the ingredients are fully blended. Next, add powdered sugar one cup at a time, mixing well after each addition. The mixture should be thick but spreadable. This filling will sink into the chocolate batter while baking, creating pockets of creamy sweetness.
Step 3: Layer the Fillings
Take spoonfuls of the cream cheese-peanut butter mixture and drop them evenly across the top of the chocolate cake batter. Don’t worry about spreading it perfectly; the mixture will sink and swirl into the cake as it bakes, creating the cracked and marbled “earthquake” look.
Step 4: Add the Candy and Chocolate
Sprinkle the chopped Reese’s peanut butter cups and chocolate chips evenly across the top. These will melt into the cake and add little bursts of peanut butter and chocolate in every bite. If you want extra texture, you can press a few larger pieces of candy lightly into the batter.
Step 5: Bake the Cake
Place the baking dish in the preheated oven and bake for about 40–45 minutes. The edges should look firm and set, while the center will appear gooey and cracked. That gooeyness is exactly what makes the cake so irresistible. Avoid overbaking, as the creamy swirls in the middle should remain soft.
Step 6: Cool and Serve
Once baked, remove the cake from the oven and allow it to cool for at least 15–20 minutes before slicing. The cake will firm up as it rests, making it easier to cut. You can serve it warm for a molten, indulgent treat or let it cool completely for neater slices. Either way, the flavors will be rich, balanced, and unforgettable.
Quick and Easy
What I love most about this recipe is how quick and easy it is to make. Using a cake mix as the base saves time, and the rest is just mixing, layering, and baking. You don’t need to fuss with complicated techniques or worry about decoration — the cake decorates itself with its cracked, marbled surface. It’s one of those desserts that looks like you spent hours on it, even though it only takes about 15 minutes of prep work.
Customizable
This recipe is also very customizable. If you want a less sweet version, swap in a dark chocolate cake mix. You could also use crunchy peanut butter instead of creamy for added texture. For a nut-free version, replace the Reese’s with chocolate chunks or caramel candies. Some people even drizzle warm fudge or caramel sauce over the top before serving to make it extra decadent. Every time I bake this cake, I find small ways to adjust it, which keeps it exciting.
Popular with Many People
This cake never fails to impress guests. Whenever I serve it at a family gathering or bring it to a potluck, it disappears quickly. The combination of chocolate, peanut butter, and cream cheese appeals to nearly everyone. It’s the kind of dessert people talk about long after they’ve finished their slice. Kids love it because of the candy, while adults appreciate the richness. If you’re looking for a dessert that pleases a crowd, this Reese’s Chocolate Peanut Butter Earthquake Cake is always a winning choice.
PrintReese’s Chocolate Peanut Butter Earthquake Cake Recipe You’ll Love

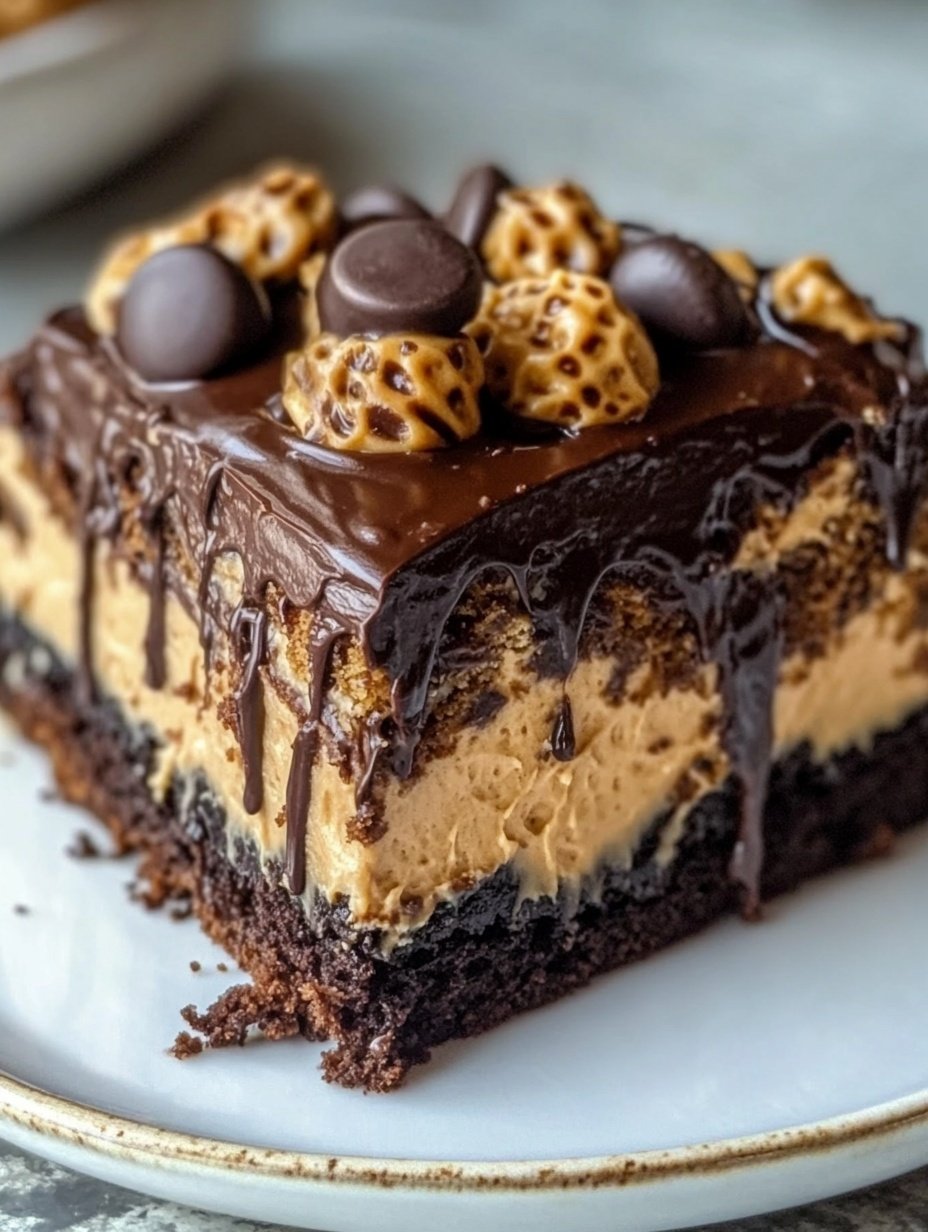
This Reese’s Chocolate Peanut Butter Earthquake Cake is a rich, gooey dessert that combines chocolate cake, a creamy peanut butter filling, and chunks of Reese’s peanut butter cups. The “earthquake” effect comes from the way the layers bake and crack, giving the cake its signature look and irresistible texture.
- Prep Time: 15
- Cook Time: 45
- Total Time: 1 hour
- Yield: 12 1x
Ingredients
- 1 box chocolate cake mix (plus ingredients listed on package: eggs, oil, water)
- 8 oz cream cheese, softened
- ½ cup unsalted butter, softened
- ½ cup creamy peanut butter
- 4 cups powdered sugar
- 1 ½ cups chopped Reese’s peanut butter cups
- 1 cup semi-sweet chocolate chips
Instructions
- Preheat oven to 350°F (175°C). Grease a 9×13-inch baking dish generously with butter or nonstick spray.
- Prepare the chocolate cake mix in a large bowl according to package instructions (usually with eggs, oil, and water). Stir until smooth and pour evenly into the baking dish.
- In another mixing bowl, beat softened cream cheese and butter until creamy. Add peanut butter and blend until smooth. Gradually add powdered sugar, one cup at a time, mixing until thick and spreadable.
- Drop spoonfuls of the cream cheese-peanut butter mixture across the cake batter. Do not spread; it will sink and swirl while baking.
- Sprinkle chopped Reese’s peanut butter cups and chocolate chips evenly over the top. Lightly press some larger pieces into the batter for extra bursts of flavor.
- Bake in the preheated oven for 40–45 minutes. The edges should be firm while the center remains gooey and cracked. Avoid overbaking.
- Remove from oven and let cool for 15–20 minutes before slicing. Serve warm with ice cream or cool for neater slices.
Notes
The cracked, uneven surface is normal and gives the cake its “earthquake” name.
For a less sweet version, use a dark chocolate cake mix.
For extra indulgence, drizzle caramel or hot fudge over slices before serving.
Store leftovers covered at room temperature for two days, or refrigerate for up to five days.
FAQs
Can I make this cake ahead of time?
Yes, you can bake this cake a day in advance. Simply let it cool completely, cover it tightly, and store it at room temperature. If you prefer serving it warm, you can reheat individual slices in the microwave for about 15–20 seconds before serving.
Do I need to refrigerate the cake?
Refrigeration is not required if you plan to eat it within two days. However, because the cake contains cream cheese, I usually recommend refrigerating it for longer storage. Wrap it well and store it in the refrigerator for up to five days. Allow it to come to room temperature or warm it slightly before serving for the best texture.
Can I freeze this cake?
Yes, this cake freezes well. Slice it into squares, wrap each piece tightly in plastic wrap, and place them in an airtight container. It will keep for up to three months. To serve, thaw overnight in the refrigerator or leave at room temperature for a few hours.
What can I substitute for Reese’s peanut butter cups?
If you don’t have Reese’s, you can use any peanut butter-flavored candies or even chop up peanut butter-filled cookies. For a nut-free option, replace them with chocolate chunks or caramel candies for a delicious variation.
How do I know when the cake is done baking?
The edges should be firm, and the center should look slightly cracked and gooey. That gooeyness is intentional and part of the cake’s charm. Avoid overbaking, as it may cause the cake to lose its creamy, molten texture.