
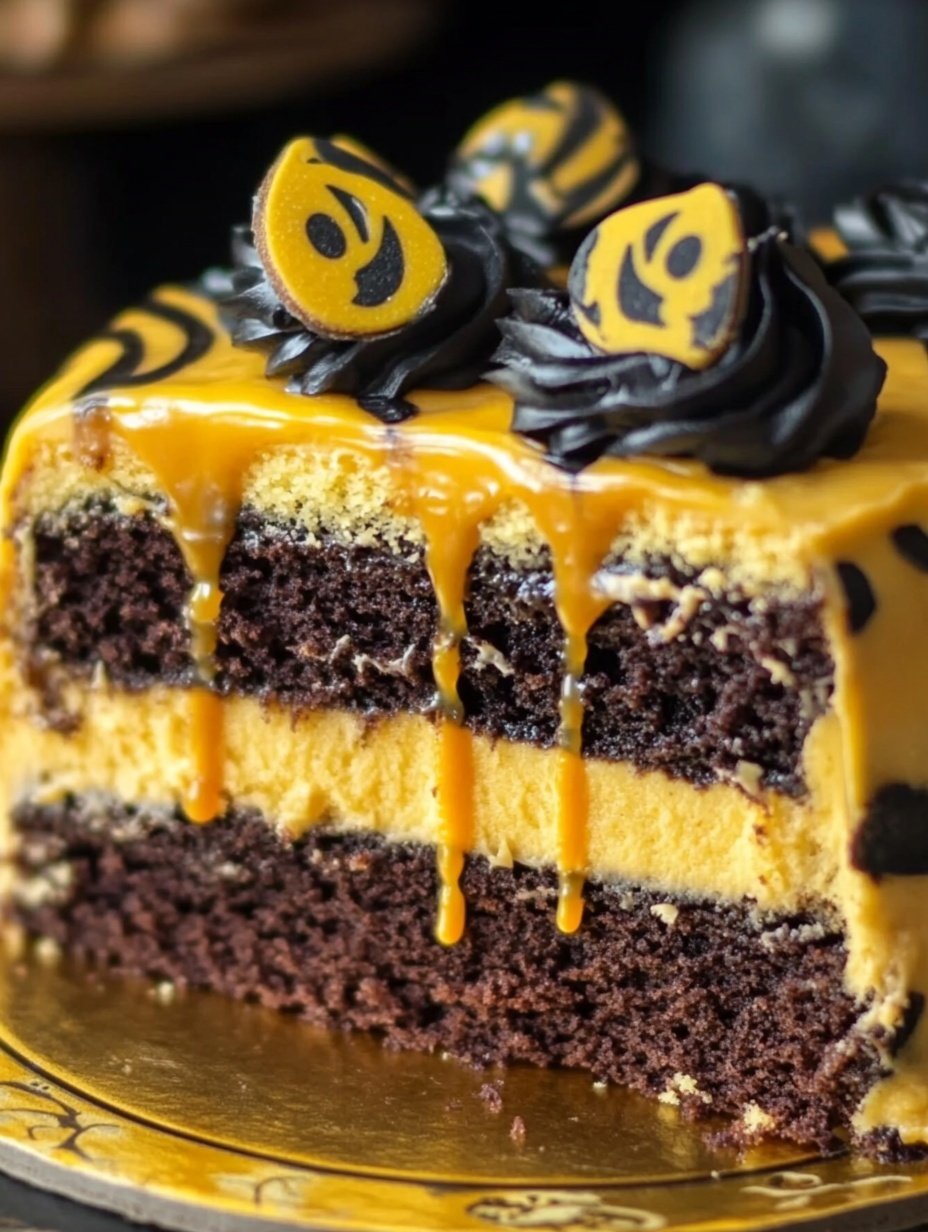
I’ve always been captivated by the magic of baking, and few things make me feel more at home in the kitchen than creating a cake that’s both whimsical and comforting. The Homemade Hufflepuff’s Layer Cake is one of those recipes that instantly brings a smile, not only because of its golden yellow layers and sweet, creamy filling but also because it embodies warmth, friendship, and a touch of enchantment. Inspired by the Hufflepuff house from the magical world of Hogwarts, this cake is all about loyalty, sweetness, and a little bit of whimsy, making it perfect for celebrations, cozy afternoons, or simply as a treat for yourself.
You will love this recipe for many reasons. First, it’s incredibly versatile—whether you want a simple tea-time slice or a show-stopping birthday centerpiece, this cake adapts beautifully. Its golden layers are tender yet sturdy enough to hold the rich, creamy frosting, while the filling adds a delightful burst of flavor that complements every bite. Second, it’s affordable, requiring ingredients that are likely already in your pantry or local grocery store, so you don’t have to hunt for anything exotic or expensive. And lastly, the process itself is fun, giving you that satisfying feeling of creating something magical from scratch.
This recipe is perfect for anyone who loves baking but also appreciates simplicity. You don’t need to be a professional baker to achieve layers that are fluffy, moist, and perfectly golden. It’s a recipe that encourages experimentation, so feel free to add a touch of cinnamon, a handful of chocolate chips, or even a swirl of caramel between the layers.
Ingredients for Homemade Hufflepuff’s Layer Cake:
-
2 ½ cups all-purpose flour
-
2 ½ tsp baking powder
-
½ tsp baking soda
-
½ tsp salt
-
1 cup unsalted butter, softened
-
2 cups granulated sugar
-
4 large eggs
-
1 tbsp vanilla extract
-
1 cup buttermilk
-
½ cup whole milk
-
Yellow food coloring (optional, for a golden Hufflepuff tone)
-
For the frosting and filling:
-
1 ½ cups unsalted butter, softened
-
4 cups powdered sugar
-
2 tsp vanilla extract
-
¼ cup heavy cream
-
With these ingredients on hand, you’re ready to dive into a baking experience that’s fun, rewarding, and utterly delicious. Each slice of this cake is like a little celebration, bringing magic and joy to any occasion.
How to Prepare Homemade Hufflepuff’s Layer Cake
Baking the Hufflepuff’s Layer Cake is both straightforward and enjoyable. With a few simple steps, you’ll transform basic ingredients into a show-stopping, golden cake that’s tender, moist, and full of flavor.
Step-by-Step Instructions:
-
Preheat the oven and prepare the pans: Preheat your oven to 350°F (175°C). Grease and flour three 8-inch round cake pans, or line them with parchment paper to prevent sticking.
-
Mix dry ingredients: In a medium bowl, whisk together 2 ½ cups of all-purpose flour, 2 ½ tsp baking powder, ½ tsp baking soda, and ½ tsp salt. Set aside.
-
Cream the butter and sugar: In a large bowl, use an electric mixer to beat 1 cup of softened butter with 2 cups of granulated sugar until the mixture is light and fluffy, about 3-4 minutes. This step ensures a tender, airy texture.
-
Add eggs and vanilla: Beat in 4 large eggs, one at a time, ensuring each egg is fully incorporated before adding the next. Stir in 1 tbsp of vanilla extract.
-
Combine wet and dry ingredients: Gradually add the dry mixture to the butter mixture in three parts, alternating with 1 cup of buttermilk. Begin and end with the dry ingredients. Mix until just combined; avoid overmixing to maintain a tender crumb.
-
Add milk and optional color: Gently fold in ½ cup of whole milk and yellow food coloring if desired, blending until the batter is smooth and evenly colored.
-
Divide and bake: Evenly divide the batter among the prepared cake pans. Smooth the tops with a spatula. Bake for 25-30 minutes, or until a toothpick inserted into the center comes out clean.
-
Cool the layers: Allow the cakes to cool in their pans for 10 minutes, then transfer them to a wire rack to cool completely. Cooling fully prevents the frosting from melting.
-
Prepare the frosting: Beat 1 ½ cups of softened butter until creamy. Gradually add 4 cups powdered sugar, mixing well. Stir in 2 tsp vanilla extract and ¼ cup heavy cream until smooth and spreadable. Adjust the cream quantity if needed for desired consistency.
-
Assemble the cake: Place the first cake layer on a serving plate. Spread a generous layer of frosting evenly on top. Repeat with the second layer, then top with the third cake layer. Frost the top and sides, smoothing with a spatula.
-
Optional decorations: Use piping techniques, edible glitter, or golden sprinkles to give a magical Hufflepuff-inspired look. Chill briefly to set the frosting before slicing.
This cake is quick and easy to make with clear steps, yet the result is impressively elegant. It’s also customizable: you can add a layer of fruit jam, caramel drizzle, or a sprinkle of chocolate chips to match your taste.
Thanks to its soft, golden layers and rich, creamy frosting, this cake is popular with many people, from kids to adults, making it ideal for birthdays, themed parties, or any special occasion where a touch of magic is welcome.
Print✨🍰 Homemade Hufflepuff’s Layer Cake – A Delightful & Cozy Dessert! 🍯🌿
This Homemade Hufflepuff’s Layer Cake is a magical and comforting dessert with soft, golden layers and a rich, creamy frosting. Perfect for birthdays, themed parties, or cozy gatherings, it is versatile, affordable, and simple enough for bakers of all levels to create.
- Prep Time: 25
- Cook Time: 30
- Total Time: 55 minutes
- Yield: 12 1x
Ingredients
Cake Layers:
- 2 ½ cups all-purpose flour
- 2 ½ tsp baking powder
- ½ tsp baking soda
- ½ tsp salt
- 1 cup unsalted butter, softened
- 2 cups granulated sugar
- 4 large eggs
- 1 tbsp vanilla extract
- 1 cup buttermilk
- ½ cup whole milk
- Yellow food coloring (optional)
Frosting and Filling:
- 1 ½ cups unsalted butter, softened
- 4 cups powdered sugar
- 2 tsp vanilla extract
- ¼ cup heavy cream
Instructions
- Preheat oven to 350°F (175°C) and prepare three 8-inch round cake pans.
- Whisk together flour, baking powder, baking soda, and salt; set aside.
- Beat butter and sugar until light and fluffy.
- Add eggs one at a time, then stir in vanilla.
- Gradually alternate adding dry mixture and buttermilk to the butter mixture, starting and ending with dry ingredients.
- Fold in milk and optional yellow food coloring until smooth.
- Divide batter evenly among prepared pans and bake 25-30 minutes, until a toothpick comes out clean.
- Cool cakes in pans 10 minutes, then transfer to wire racks.
- Beat butter for frosting until creamy. Gradually add powdered sugar, then vanilla and heavy cream until smooth.
- Assemble the cake by layering frosting between cake layers and covering the top and sides. Smooth with a spatula.
- Decorate as desired. Chill briefly to set frosting before slicing.
Notes
Ensure cakes are fully cooled before frosting to prevent melting.
Optional: Brush each layer with milk or simple syrup for extra moisture.
Customize with fruit preserves, caramel, or chocolate chips for added flavor.
FAQs – Homemade Hufflepuff’s Layer Cake
1. Can I make this cake in advance?
Yes, you can bake the cake layers a day ahead. Wrap them tightly in plastic wrap and store at room temperature. Frost the cake the next day for best results.
2. Can I use a different milk substitute?
Absolutely. You can replace whole milk with almond milk, oat milk, or any preferred non-dairy milk. Just ensure it’s unsweetened to maintain the cake’s balance of flavors.
3. How do I prevent the cake from drying out?
Avoid overbaking and check doneness with a toothpick. Additionally, brushing each layer with a little milk or simple syrup before frosting can keep it moist.
4. Can I make this cake gluten-free?
Yes, substitute the all-purpose flour with a 1:1 gluten-free flour blend. Be sure the blend contains xanthan gum or another binding agent for structure.
5. How should I store leftover cake?
Store the frosted cake in an airtight container at room temperature for up to 2 days. For longer storage, refrigerate for up to 5 days or freeze the unfrosted layers for up to 2 months.
6. Can I add other flavors or fillings?
Certainly! You can layer in fruit preserves, chocolate ganache, or even a cream cheese frosting. The cake’s soft, golden layers complement a variety of fillings.